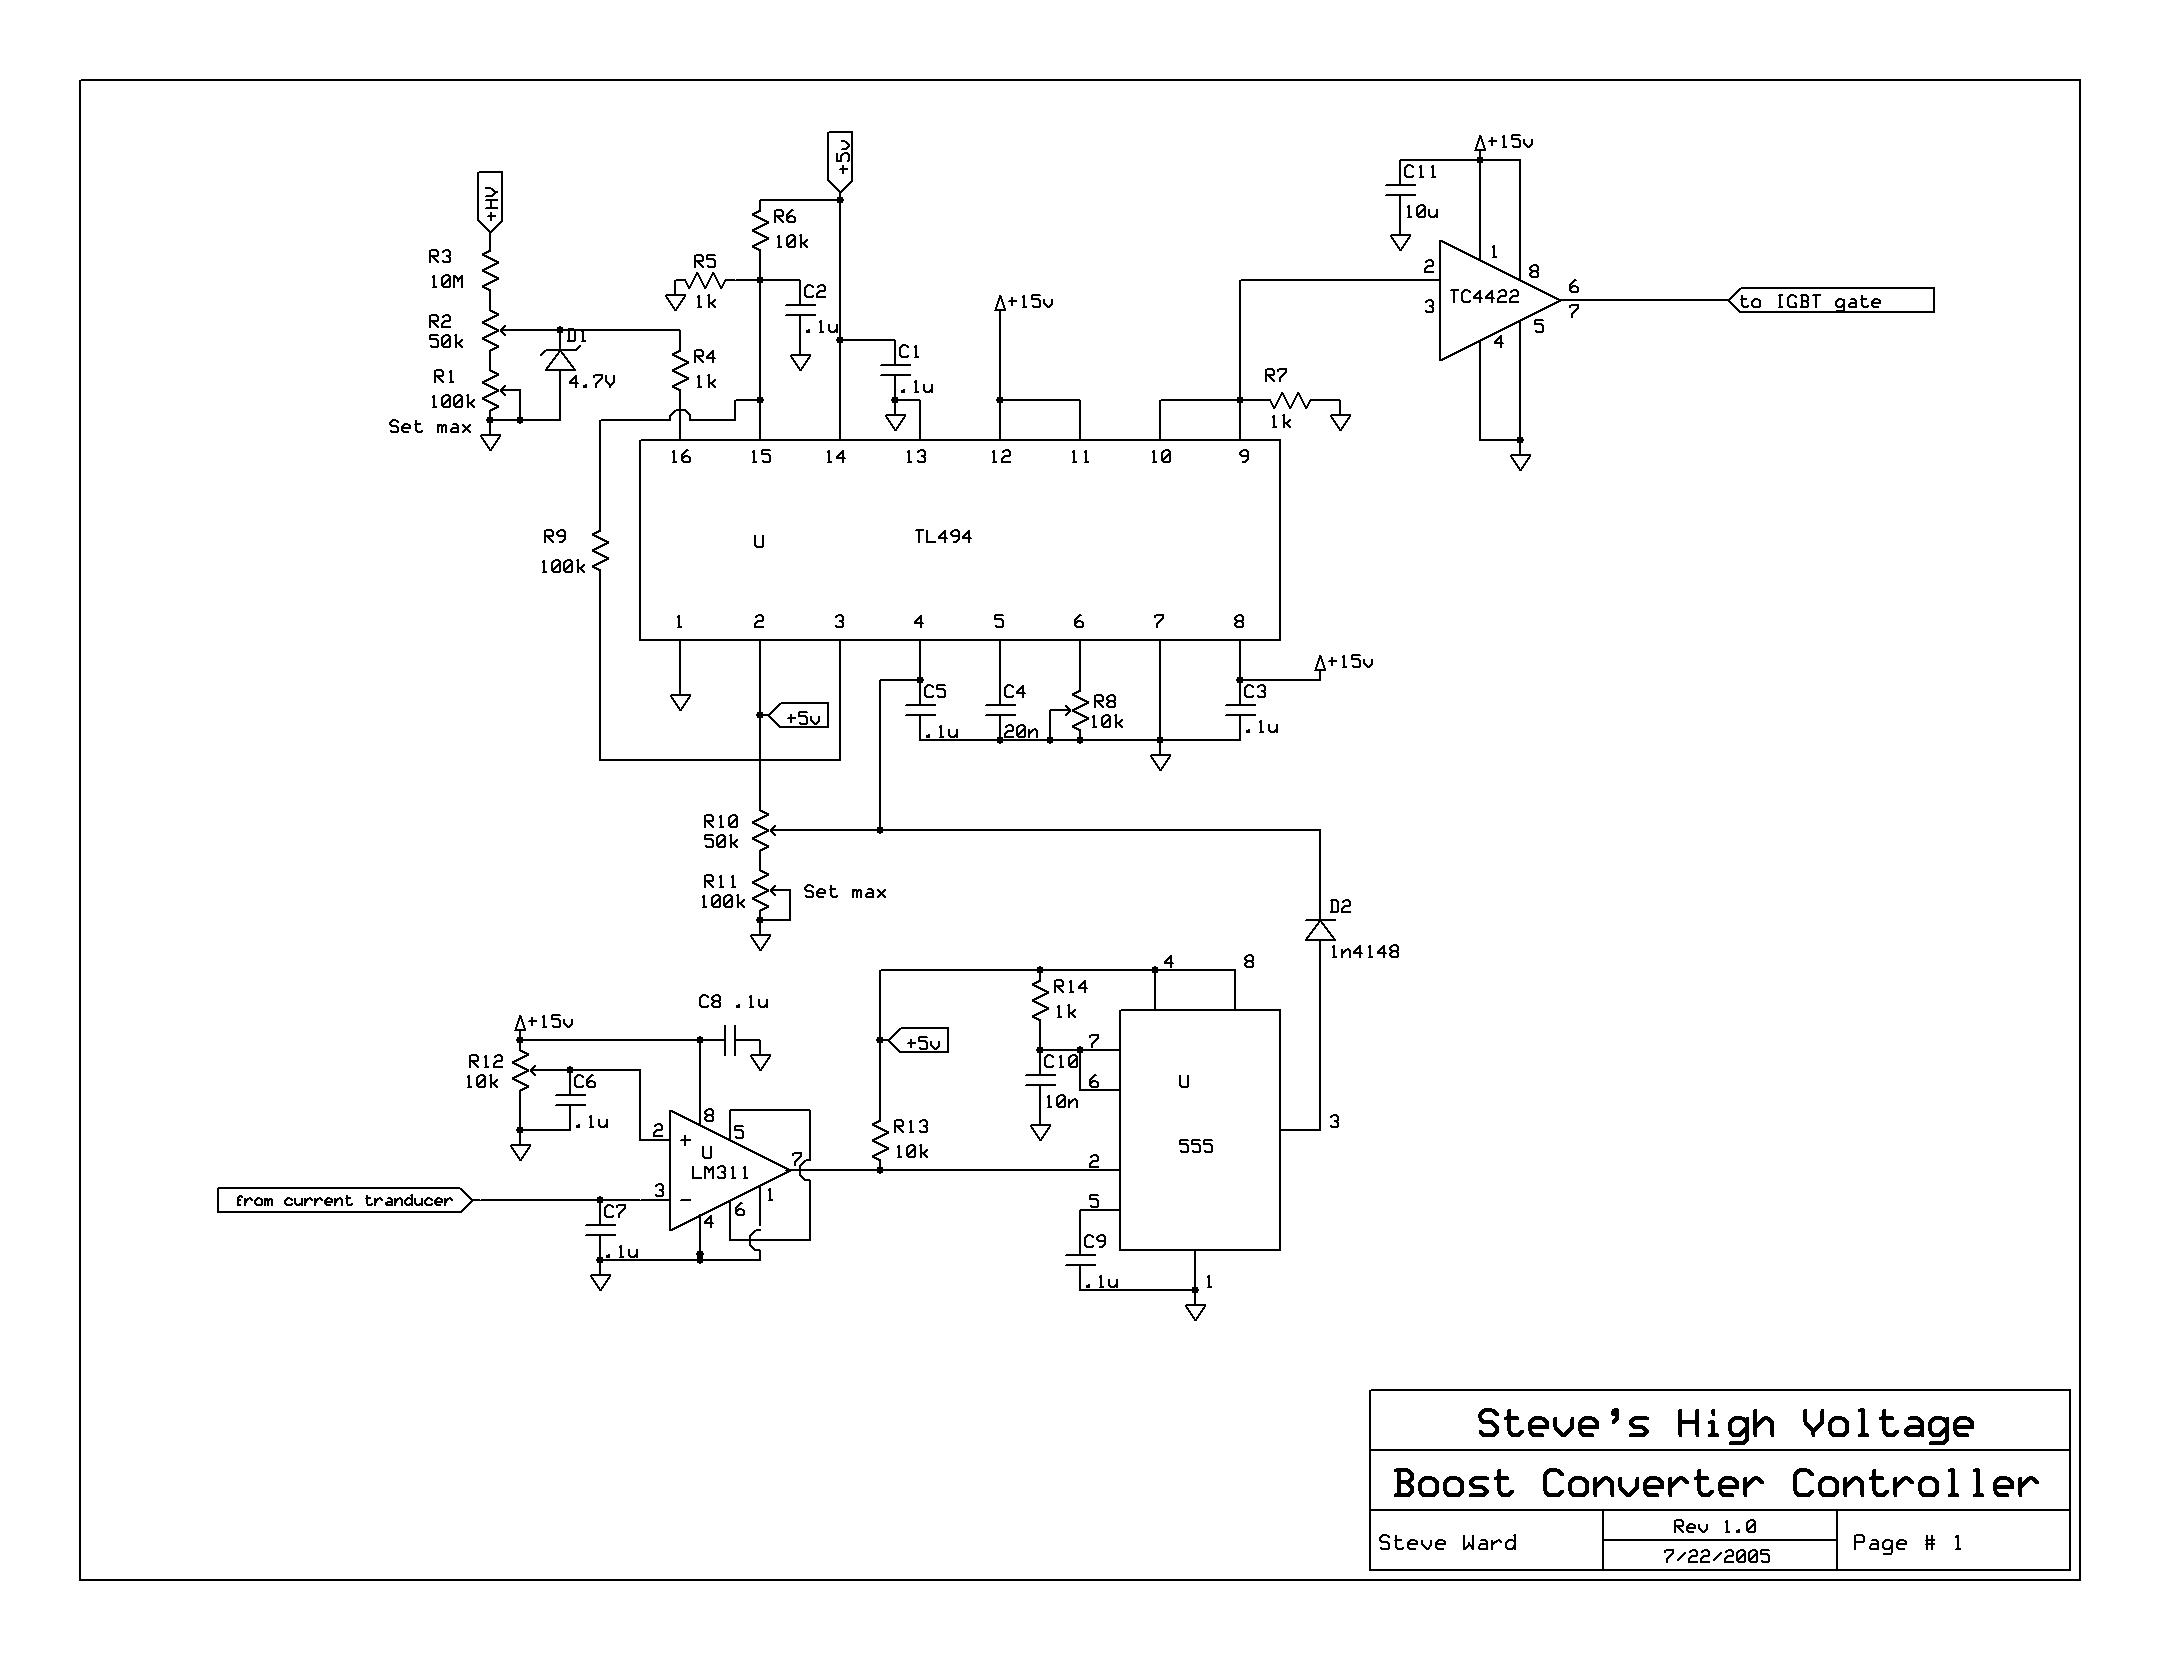
 This
is the schematic for the controller. See update schematics below.
This
is the schematic for the controller. See update schematics below.Boost Converter
This boost converter is a result of the frustration of line droop when powering my DRSSTCs, as well as my quest for gaining experience with power electronic design. The boost converter has a few things to offer me in my situation. Firstly, line droop will no longer matter, as a lower input voltage to a boost converter simply requires that you increase the duty cycle (simple turn of a pot). Secondly, when running properly, the power factor will be on the order of .95 or better (first tests show a PF of .99). This is because it continually draws current throughout the entire mains voltage cycle, and the current drawn is directly proportional to the voltage applied, assuming duty cycle is held constant within the boost converter itself. So here I am (6/22/05), after about 1 month of design and re-design, finally at the stage of testing.
Design Specs (so far):
Operating frequency: 10khz
Expected output power: 5000W
Output voltage: (880V at 5kw, 440V at 1250W)
Inductor: 200uH on 4kW core
IGBT: HGTG18N120BND
Feedback: Voltage and Current
PWM IC: TL494, along with a few other ICs.
This
is the schematic for the controller. See update schematics below.
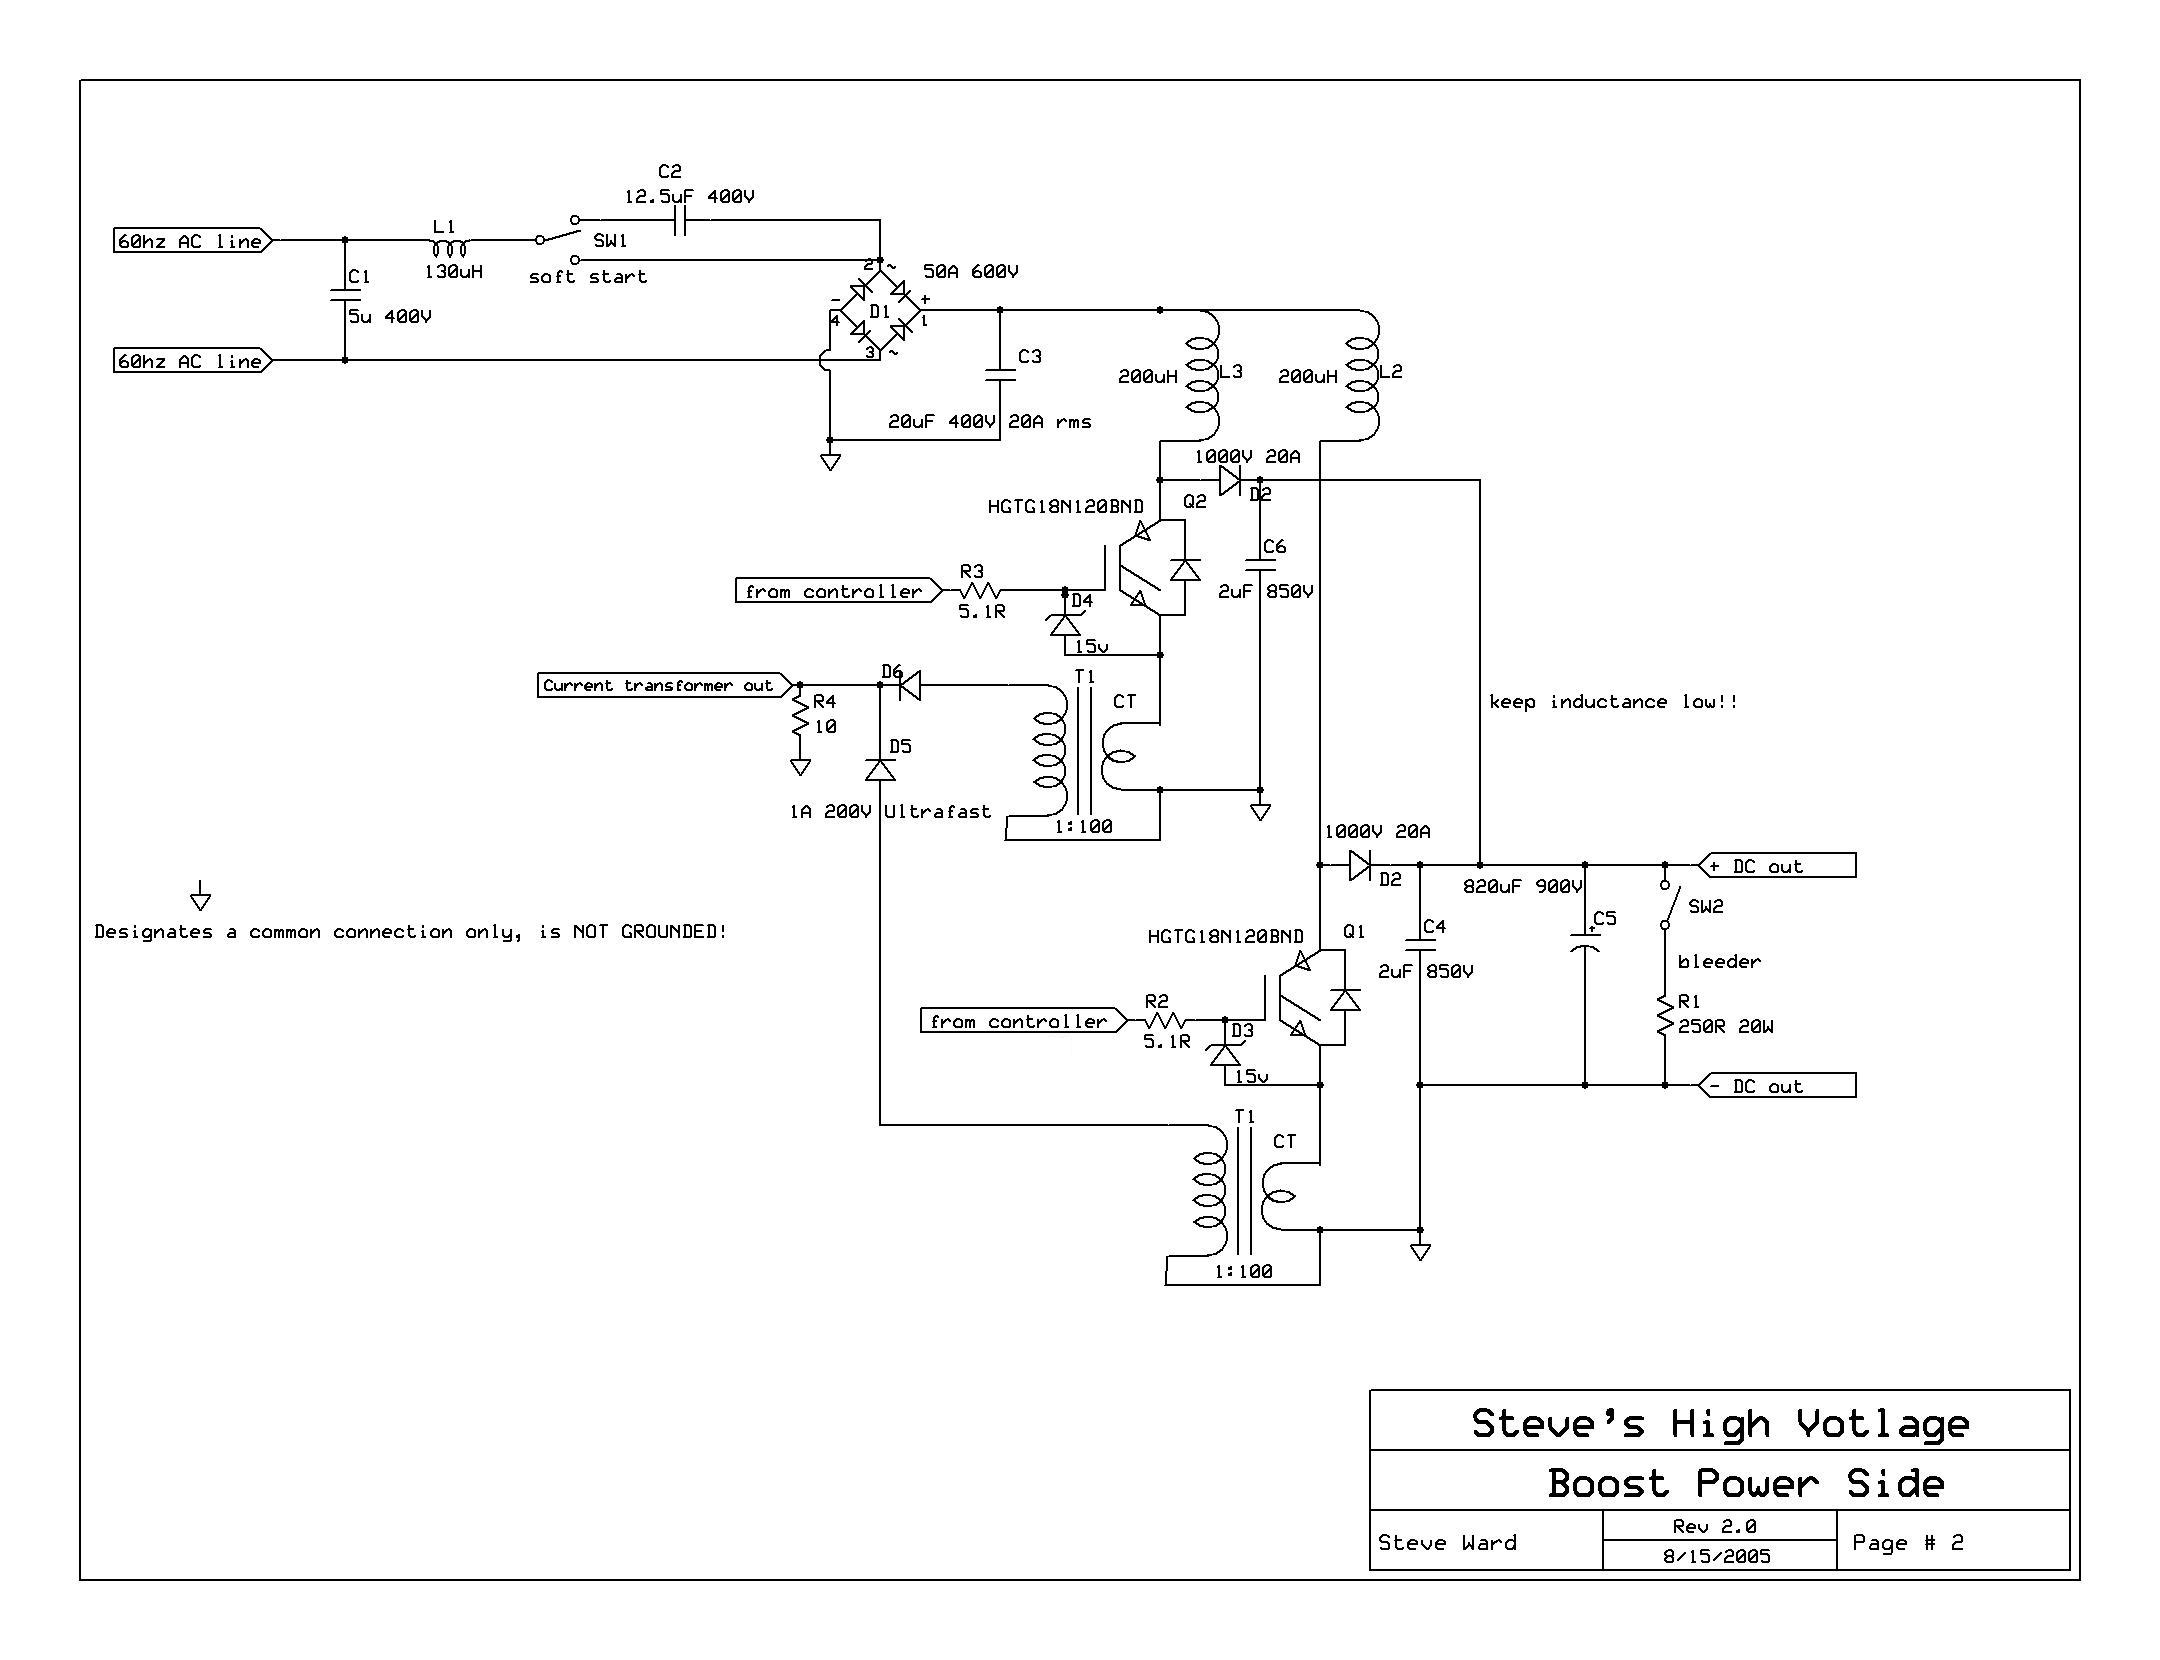
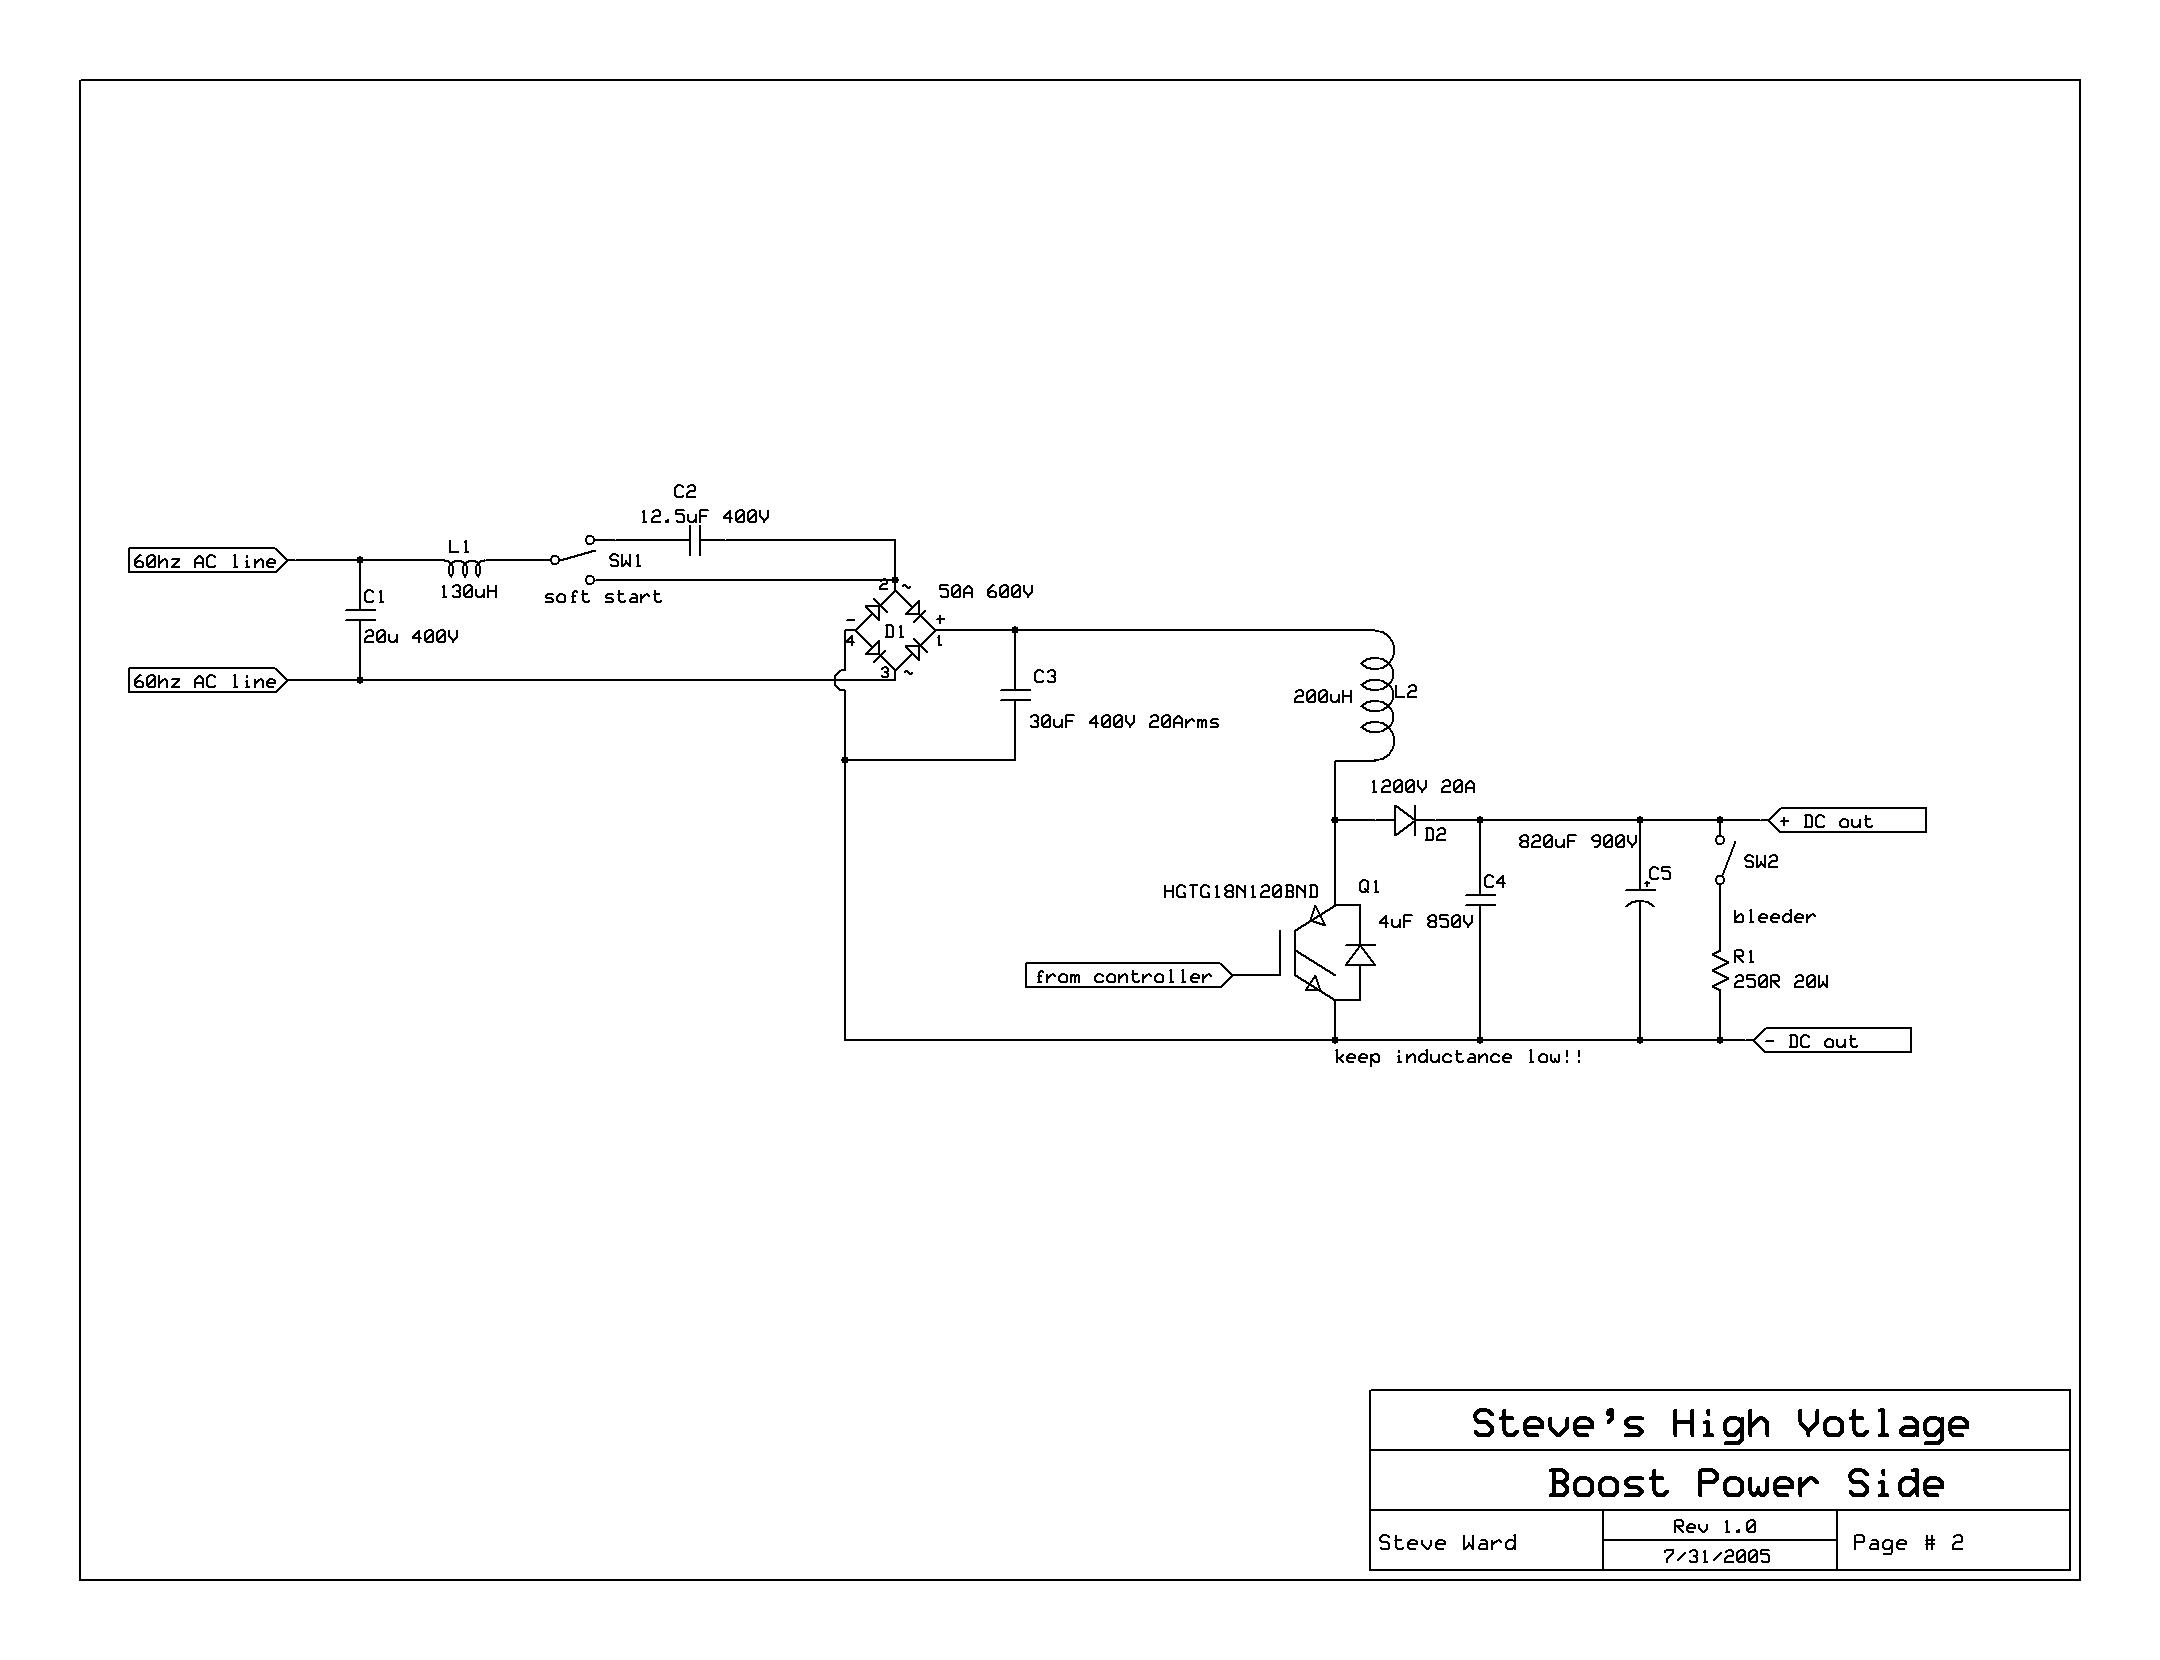 Here
is the schematic for the high voltage/power side of things. See update
schematics below.
Here
is the schematic for the high voltage/power side of things. See update
schematics below.
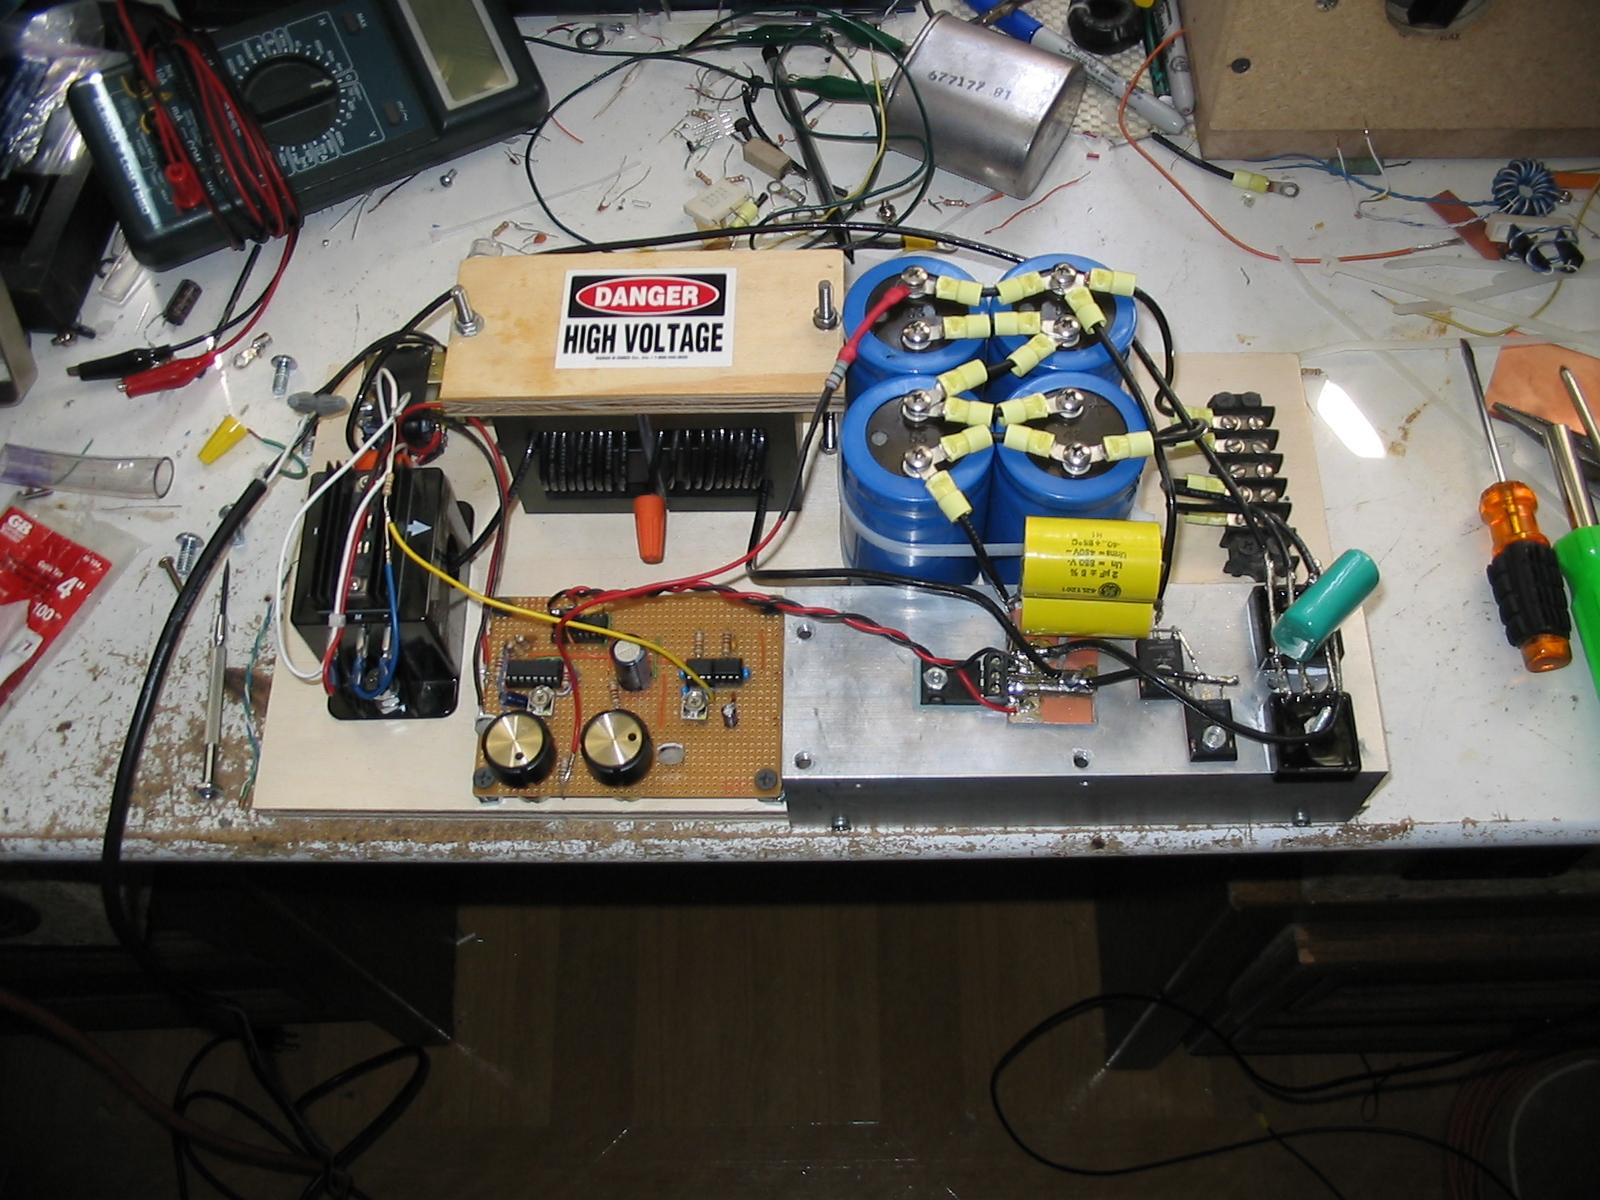 Here
it is in its entirety (so far). The IGBT used here is rate 1200V at 54A
(HGTG18N120BND).
Here
it is in its entirety (so far). The IGBT used here is rate 1200V at 54A
(HGTG18N120BND).
 Here
we see the AC input, DC output, and the 900V 820uF filter bank. The
capacitance doesn't have to be too great, because most of the energy is stored
at the DRSSTC end.
Here
we see the AC input, DC output, and the 900V 820uF filter bank. The
capacitance doesn't have to be too great, because most of the energy is stored
at the DRSSTC end.
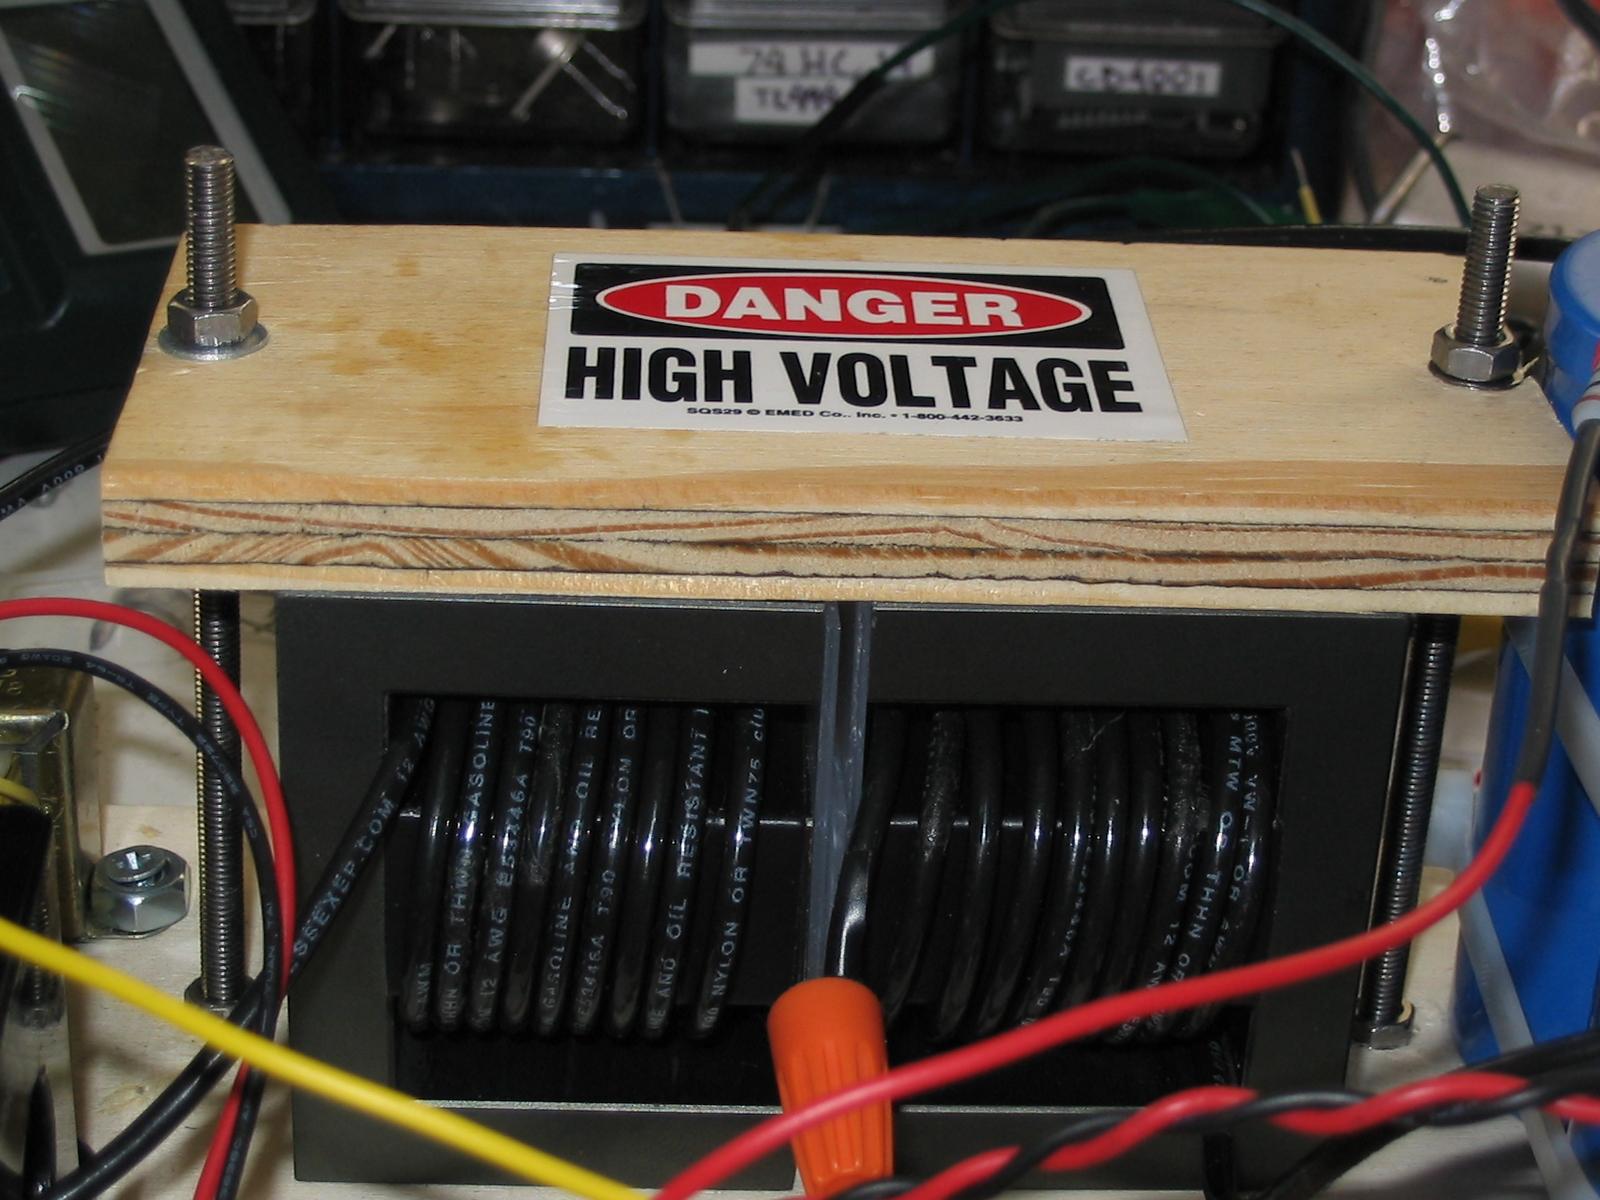 Here
is the inductor, 200uH, should be good for 400V at 10khz, the cores are "rated"
at 4kVA total. It has 20 turns of 12awg, with a 3/16" gap between the
cores. Most of the energy is stored in this air gap, and it is essential
for inductor design.
Here
is the inductor, 200uH, should be good for 400V at 10khz, the cores are "rated"
at 4kVA total. It has 20 turns of 12awg, with a 3/16" gap between the
cores. Most of the energy is stored in this air gap, and it is essential
for inductor design.
 The
control electronics consists of a TL494 PWM. There is both voltage and
current limiter circuits.
The
control electronics consists of a TL494 PWM. There is both voltage and
current limiter circuits.
 Here
is the LEM current transducer I use to sense the inductor current. The
module is basically like a Current Transformer that can handle DC currents.
It is rated to 200A, and is perfectly suited for this application. It has
much to offer over a current shunt: no wasted power, and the signal is already
in the voltage range I desire (no need to amplify a very low level signal).
Here
is the LEM current transducer I use to sense the inductor current. The
module is basically like a Current Transformer that can handle DC currents.
It is rated to 200A, and is perfectly suited for this application. It has
much to offer over a current shunt: no wasted power, and the signal is already
in the voltage range I desire (no need to amplify a very low level signal).
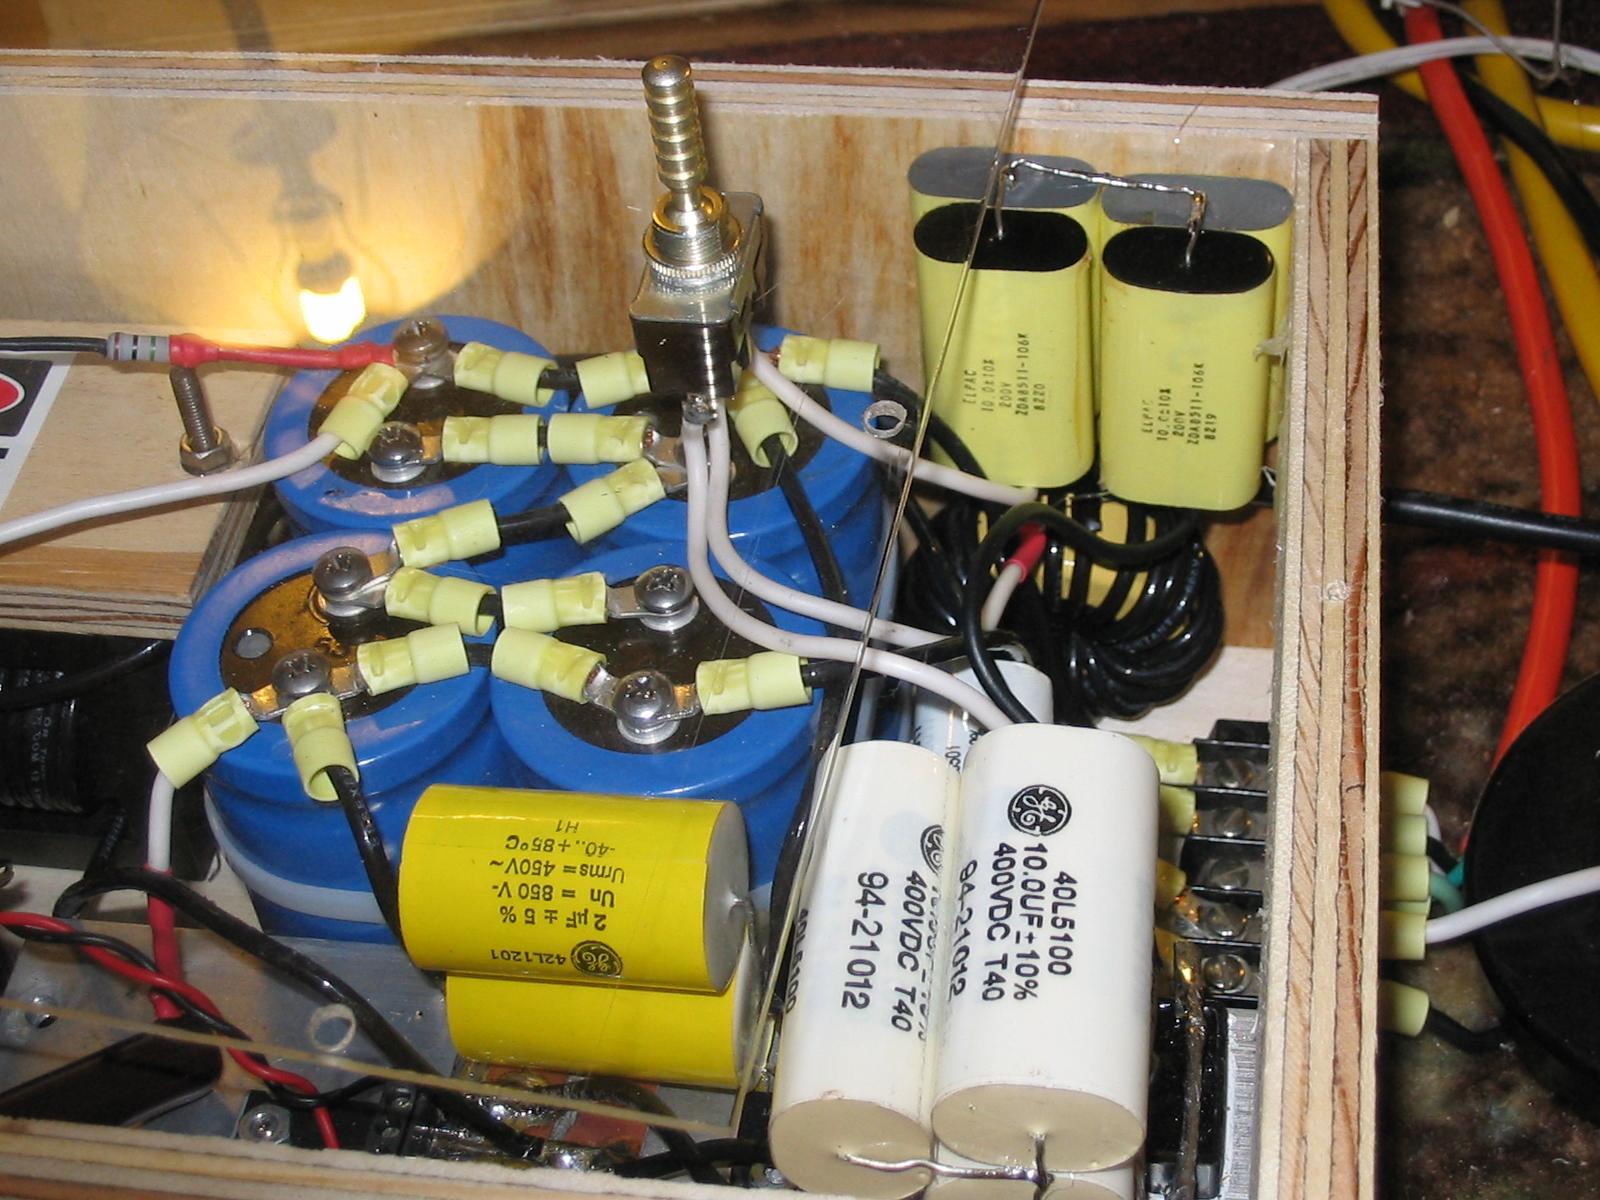
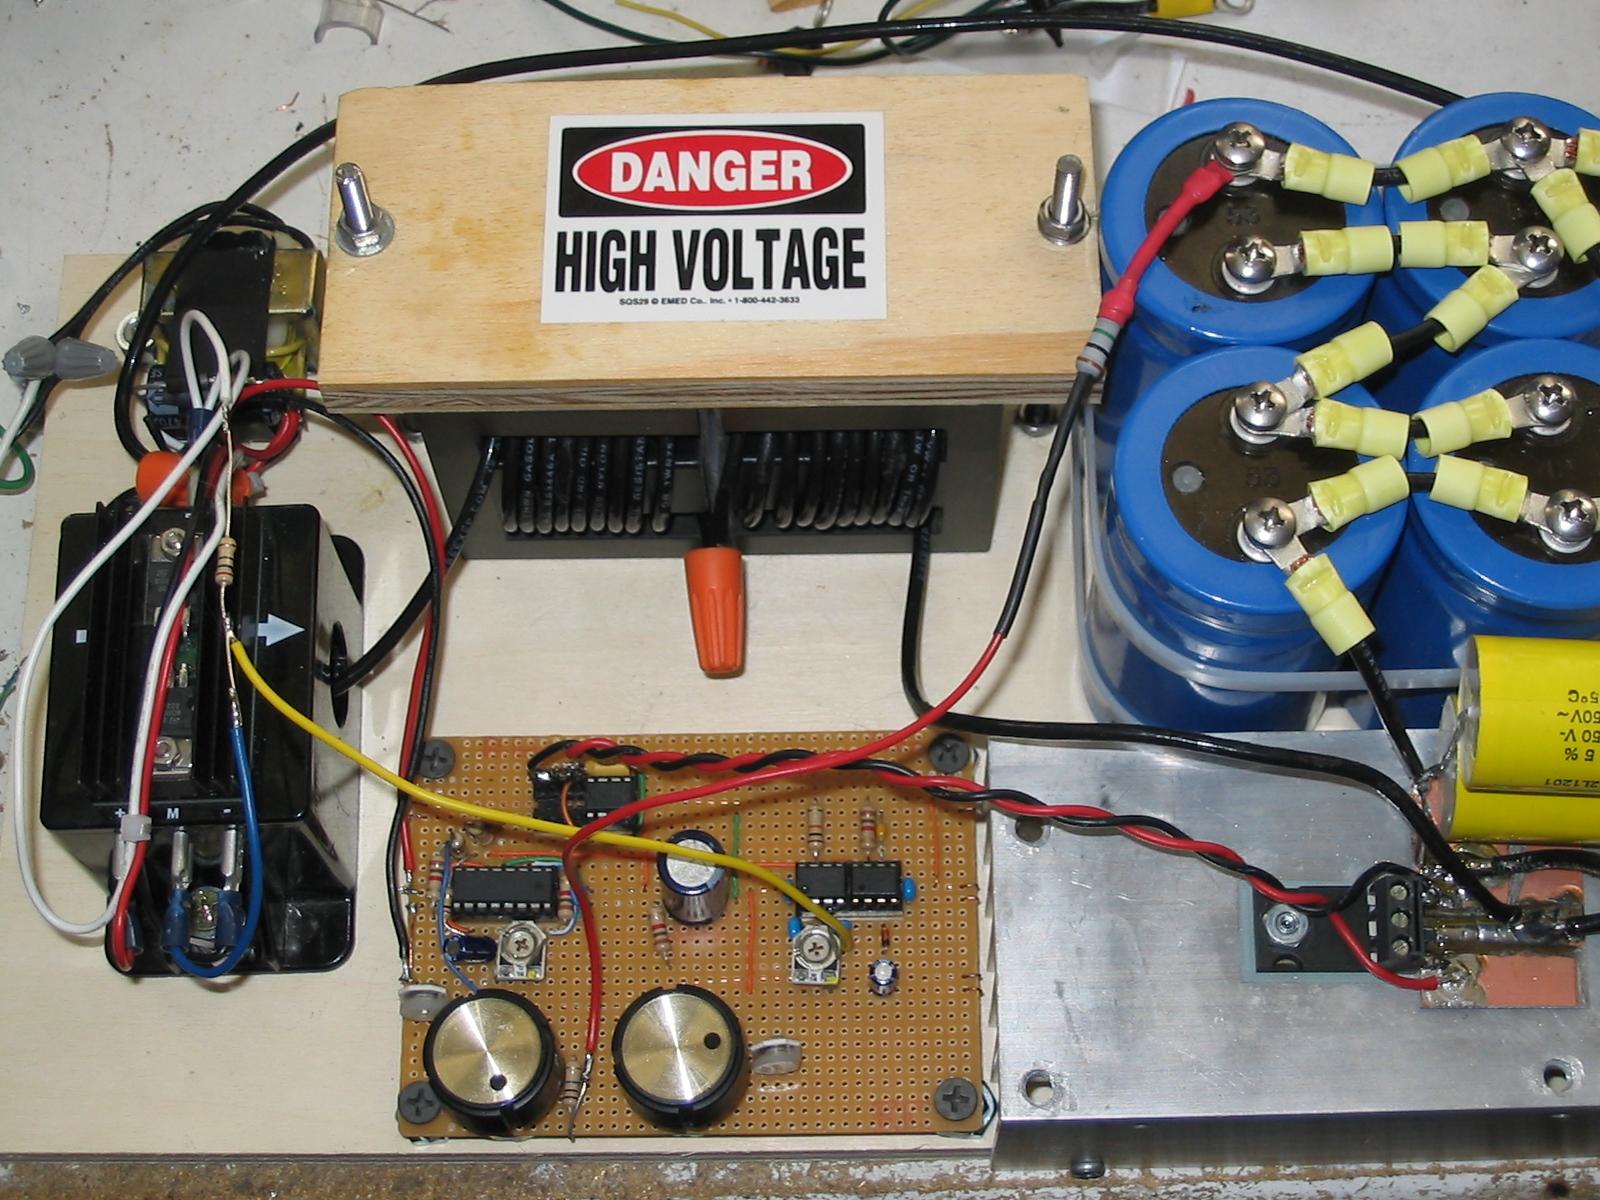
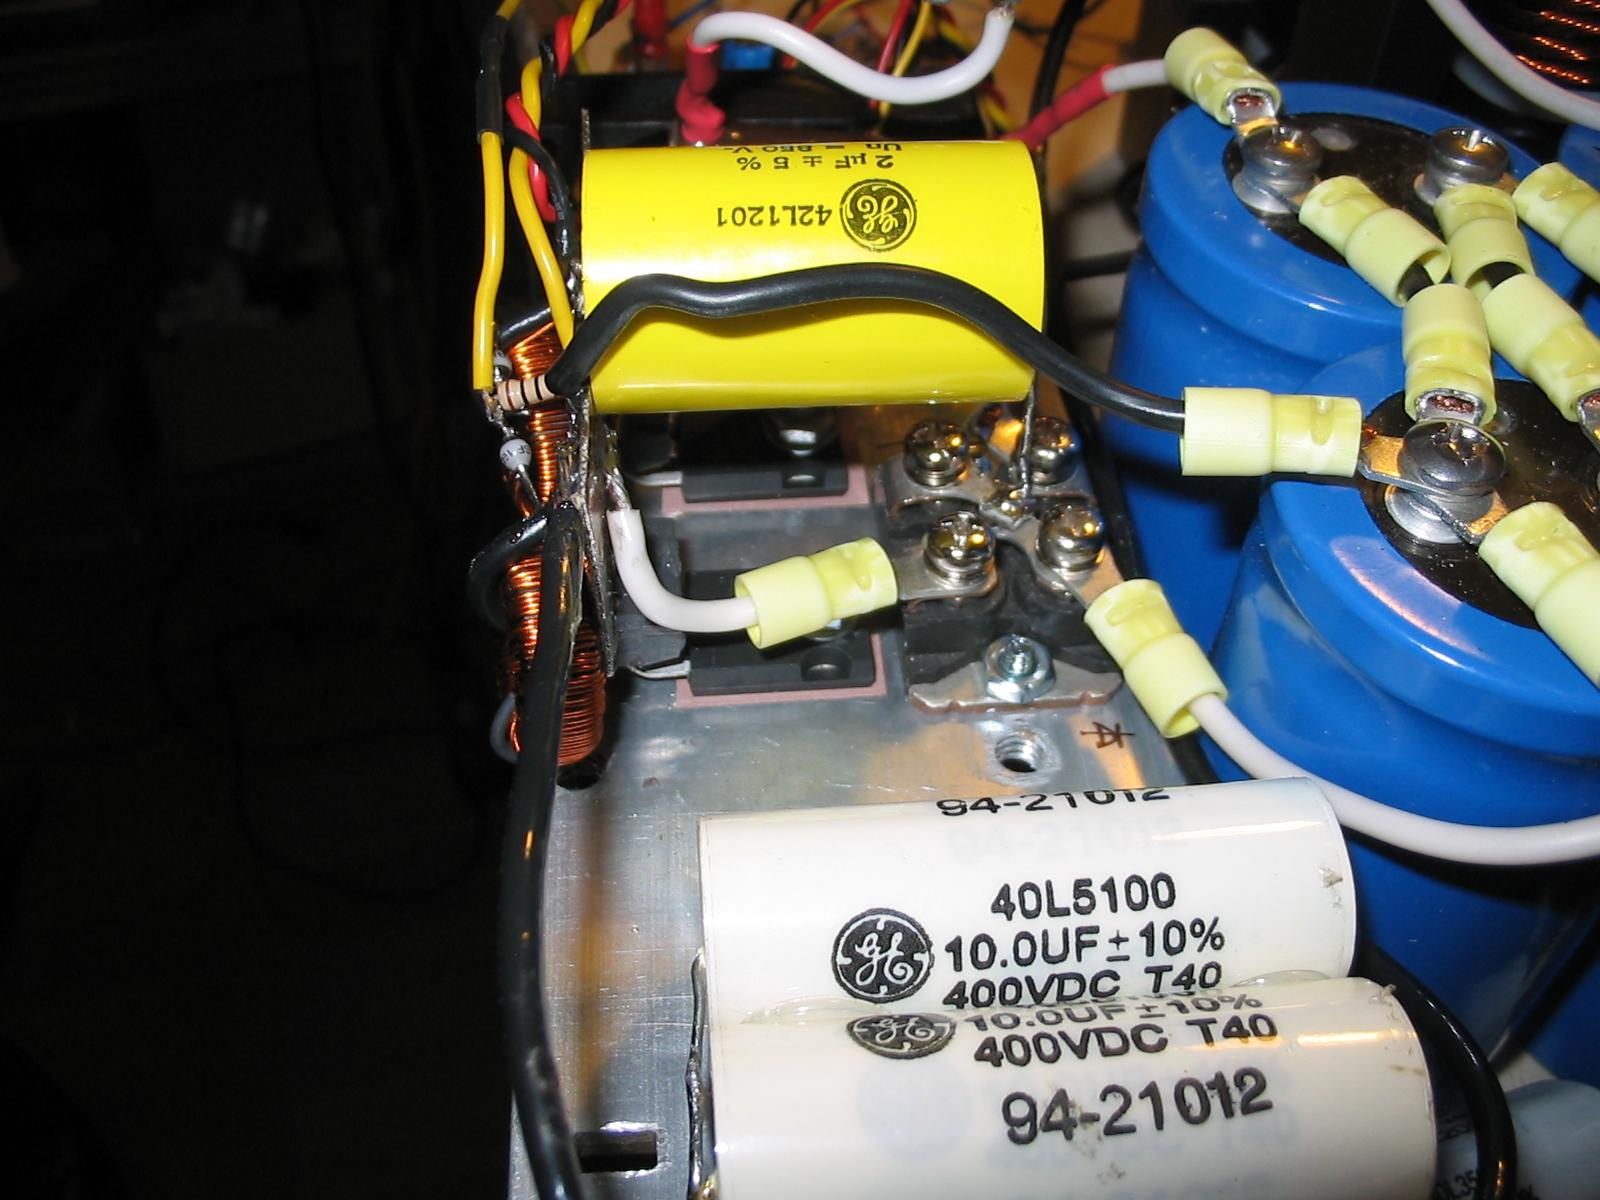
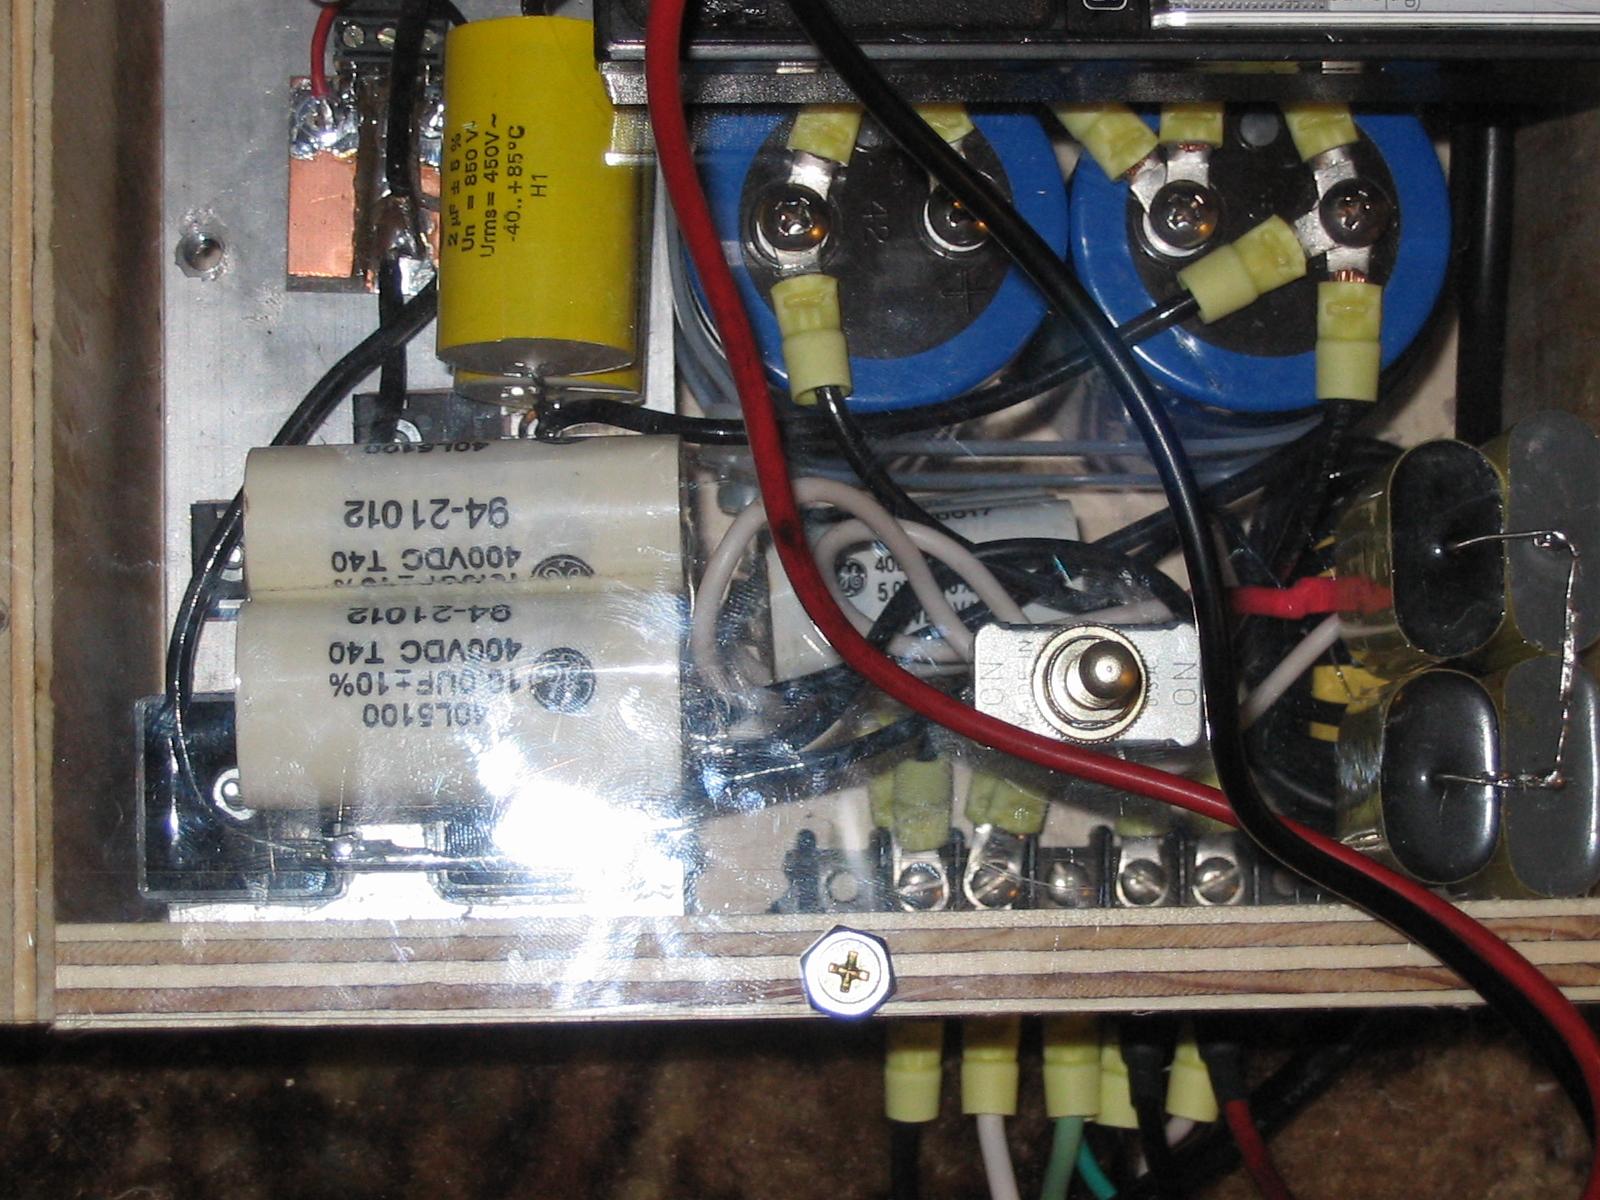 Seen
here are the various filtering (10khz filtering) capacitors. I have 20uF
right on the AC input, then a .1mH inductor. After the full-wave rectifier
there is an additional 30uF (the large white caps). There are also some
oval shaped yellow capacitors, making up a 12.5uF 400V cap, used as a "soft
start" to initially charge the lytics up to the input voltage.
Seen
here are the various filtering (10khz filtering) capacitors. I have 20uF
right on the AC input, then a .1mH inductor. After the full-wave rectifier
there is an additional 30uF (the large white caps). There are also some
oval shaped yellow capacitors, making up a 12.5uF 400V cap, used as a "soft
start" to initially charge the lytics up to the input voltage.
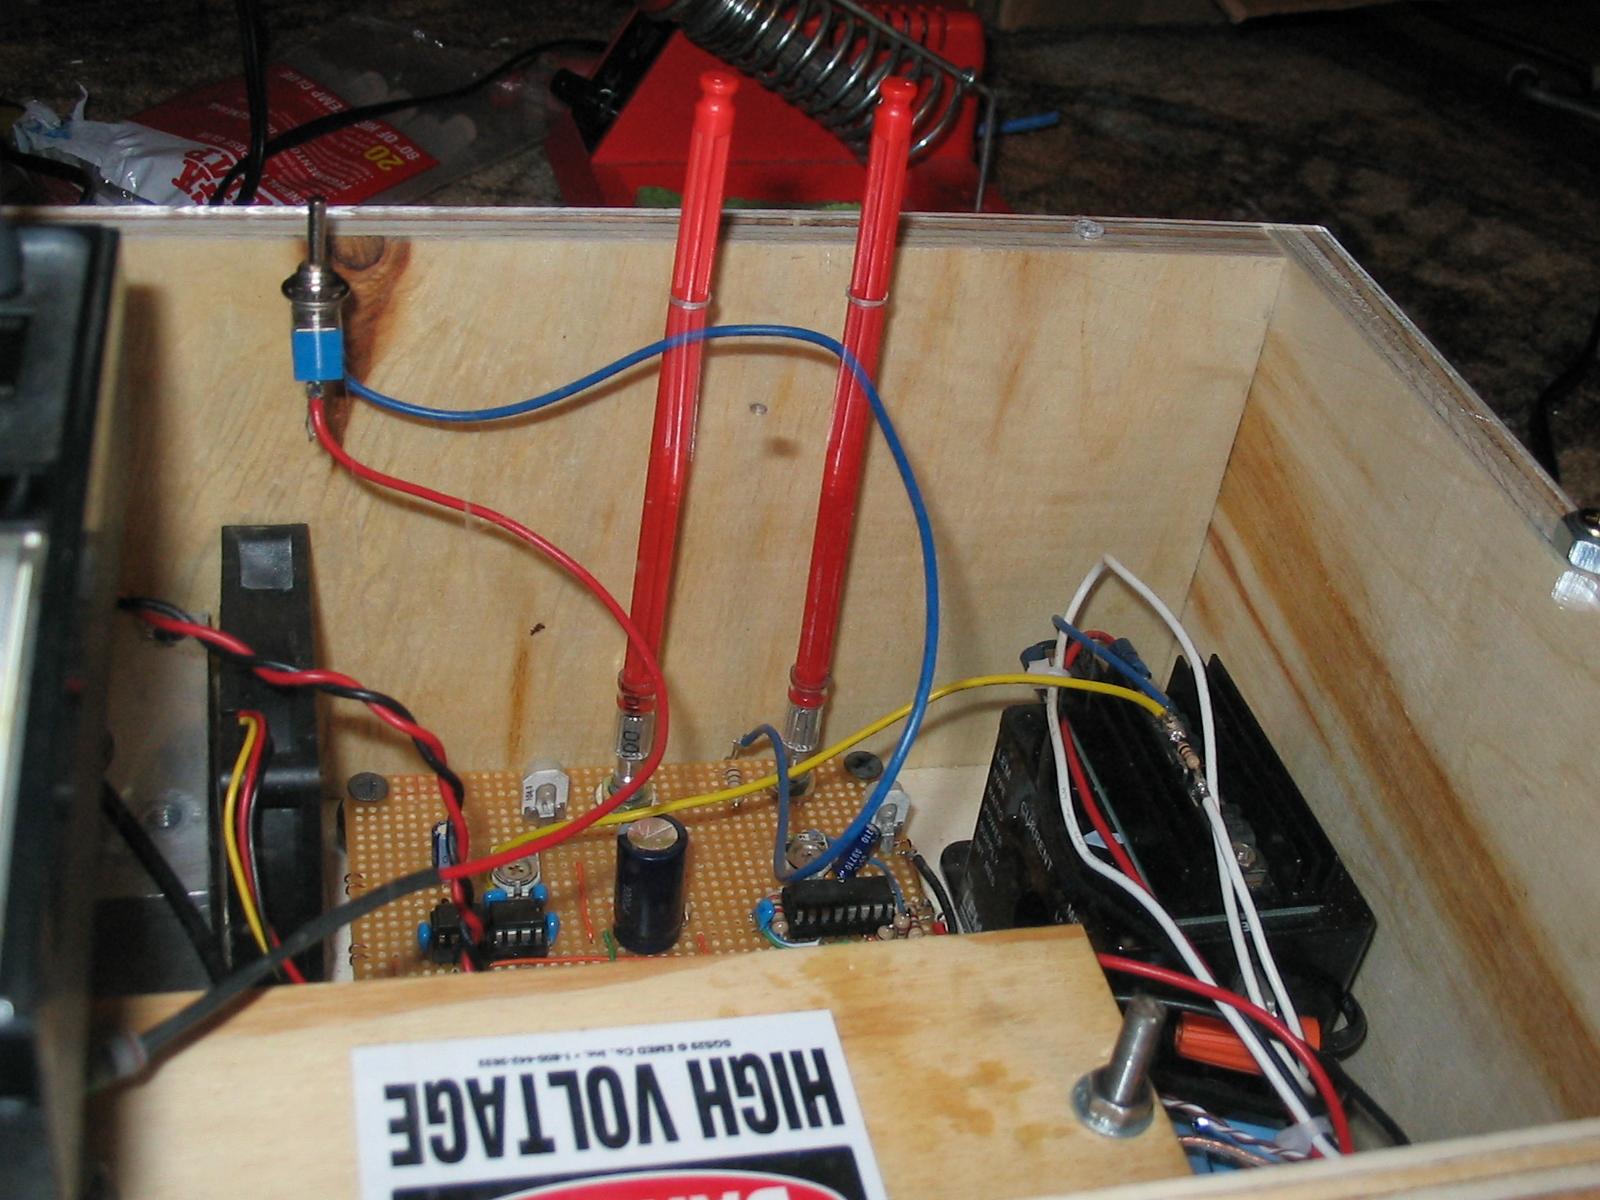 Since
the control circuit is floating at -425VDC (at 850VDC output), it's important to
have some isolation between the operator and the circuit! I used these
plastic extensions on the pots. I will add some knobs later.
Since
the control circuit is floating at -425VDC (at 850VDC output), it's important to
have some isolation between the operator and the circuit! I used these
plastic extensions on the pots. I will add some knobs later.
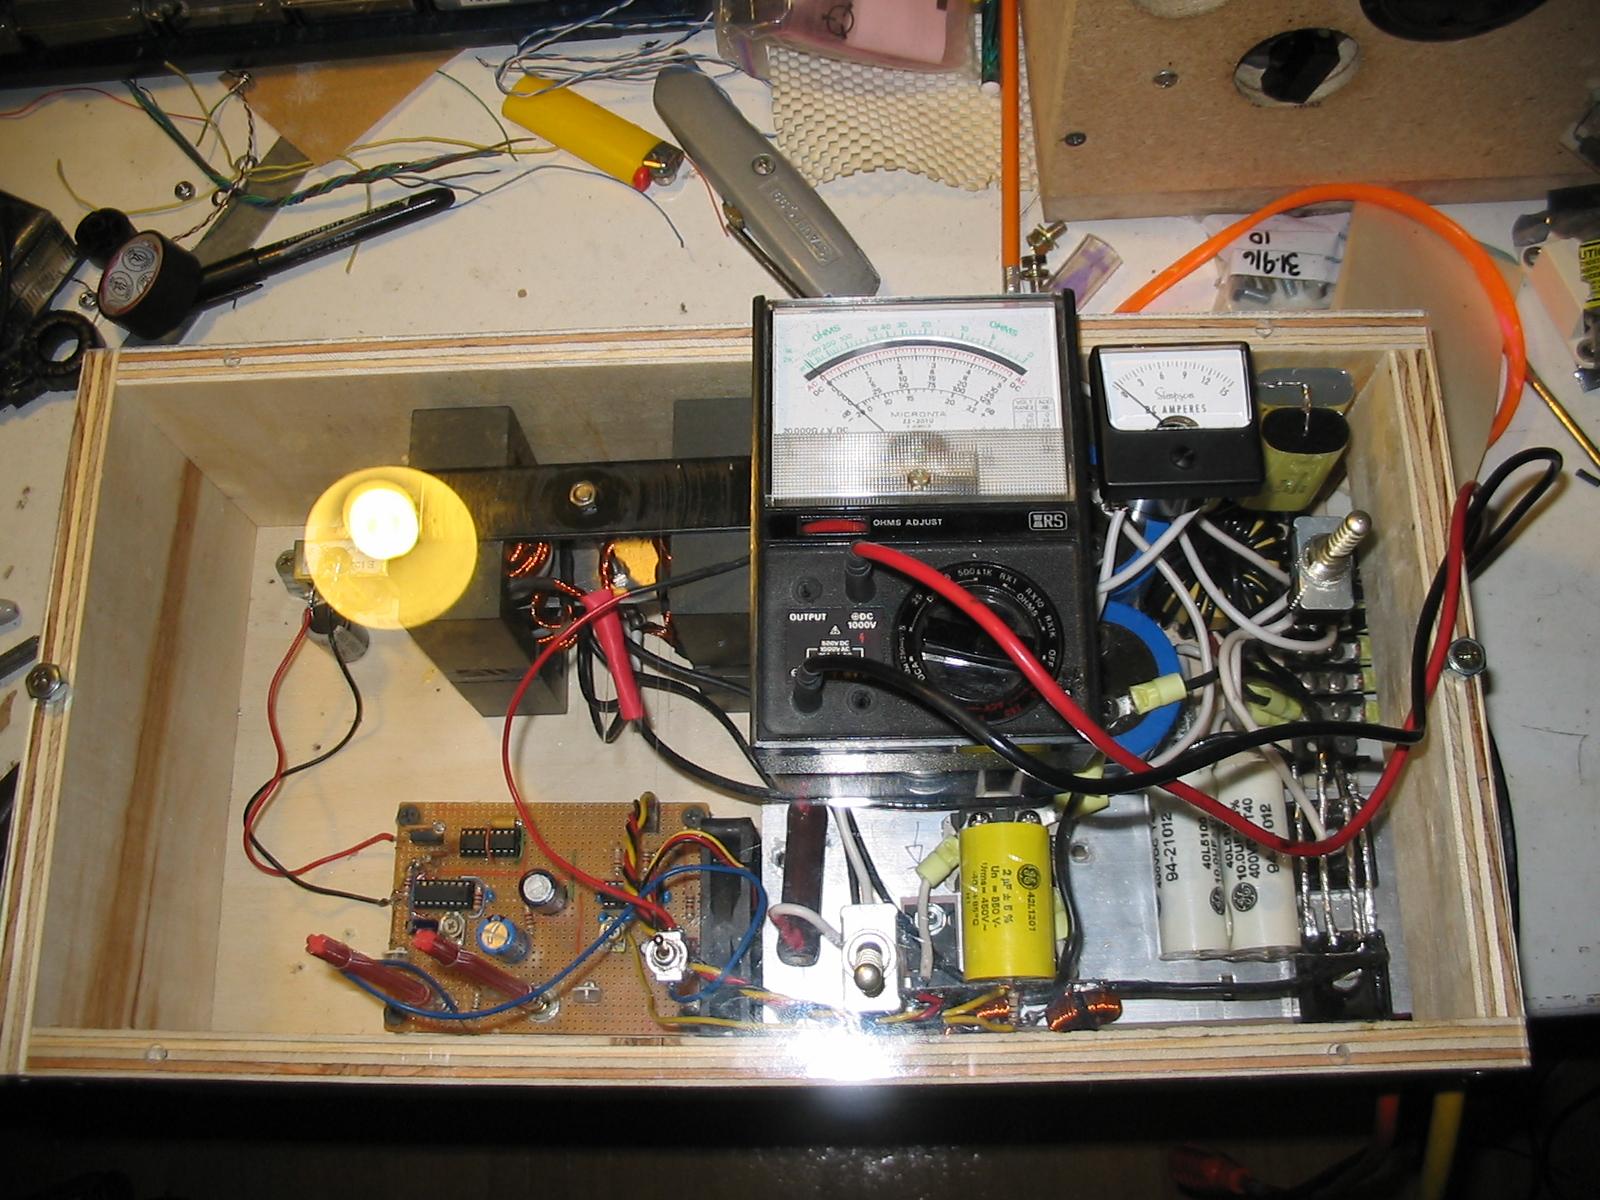
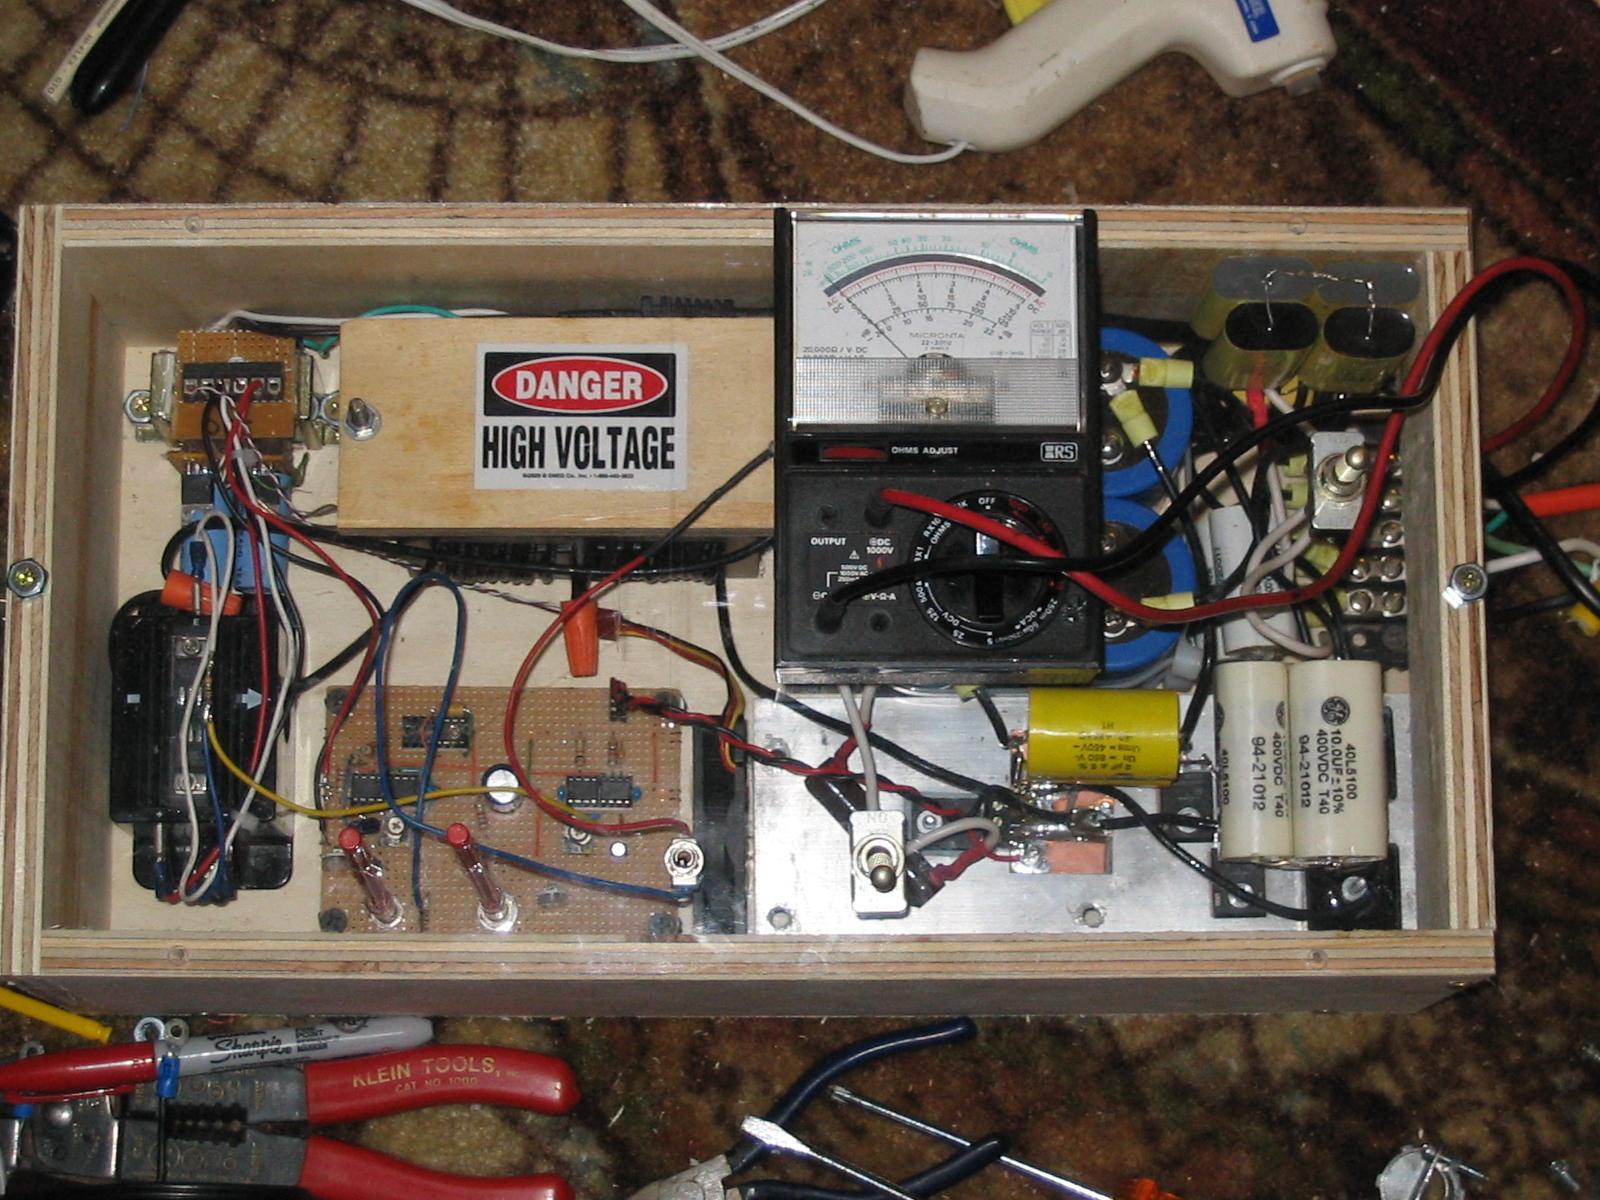 Just
about "finished". I glued an old multi-meter to the top of the box.
The meter will be primarily used to read the output voltage, and has a 500V and
1kV DC range, which is perfect for my application.
Just
about "finished". I glued an old multi-meter to the top of the box.
The meter will be primarily used to read the output voltage, and has a 500V and
1kV DC range, which is perfect for my application.
Design considerations:
IGBT selection:
The selection of the IGBT can be very crucial when power dissipation is an important factor. I have to be very careful here, as I plan to extract 5000W from this converter, so even if its 95% efficient, that is 250W to burn off! I initially thought I would use a large brick IGBT, rated at 400A continuous. After initial testing I found the IGBT got rather warm at only 100-500W power levels. Then I began looking at various IGBT losses: conduction loss and switch-off (Eoff) loss. As it turns out, the conduction loss was small (only a few W), but the Eoff was terrible with the particular IGBT I was using. Every time it switched off, it would waste some 25mJ of energy, repeat at 10khz, and that would be 250W! This is all assuming the 5kw operation, the losses at 500W were probably on the order of 25W accordingly. I had only one other type of 1200V IGBT available, and that is the HGTG18N120BND from Fairchild. Its Eoff (at 40A) is only 3mJ, much better! But I expect to be switching off at up to 80A at some point, so the Eoff is roughly 6mJ (in reality it might be less as the Eoff vs. I is not a linear relationship). This suggests only 60W dissipated from Eoff losses. Conduction losses should also be considered. Pspice suggest that the average IGBT current is only 15A, so at about 2V drop, that is another 30W of dissipation, putting me at 90W total dissipation. Much better than 250W+ that I would have to deal with if I had stuck with using the IGBT brick!!
Operating Frequency:
I decided on 10khz operating frequency for a few reasons. Firstly, less Eoff losses in the IGBT. Secondly, less hysteresis loss in the inductor core. But, this is at the expense of requiring more turns on the inductor (meaning more I*I*R loss in the inductor). More turns means that smaller wire must also be used. I feel that 10khz is a good balance between them. I don't mind so much a hot inductor vs. a hot IGBT. 10khz does require more extensive line filtering, which will be covered later.
Inductor design:
This one, I'm not even so sure on, but here is what went through my head when designing the inductor. Firstly, I knew (from simulations) that I wanted about 200uH of inductance. I also knew that the average current through the inductor would be on the order of 20-25A or so. From this I figured that I could get by with 12awg. I then had to choose between using 2kva worth of core material, or 4kva worth. I figured I couldn't go wrong using more core material than needed, so I went with 4kva. The 2kva core may have required too many turns to fit in the winding window (at least not easily fit). I then calculated the minimum number of turns needed before saturating the core, and arrived at 18 turns (for a 4kva core). To be safe I used 20 turns. I then wound my 20 turns on the core, and experimentally found that I needed a .1875" gap between the 2 halves to achieve my 200uH (actually, 194uH measured). As of this moment I have not performed any calculations to determine inductor energy loss, but I would suspect something around 20-30W at least.
Control electronics:
The control electronics took a considerable amount of design time and de-bugging to arrive at something I was satisfied with. The voltage is regulated by using the internal error amplifier on the TL494. Its just an op amp, that when the + input exceeds the - input, it then begins to amplify the + voltage. I set the gain to 100. The idea here is that I only want to reduce pulse width as the voltage is right near its maximum allowable voltage, so really the op amp is almost like a comparator in a sense, but really not. So as the cap voltage reaches say 95% of the limit, the op amp will then only start to produce an output, which in turn reduces the pulse width of the TL494's output. Notice I use a 50k pot along with a 100k pot. The 50k is adjusted by the user in real time, while the 100k sets the maximum voltage allowed overall.
The other feature is the current limiter. The current transducer simply sends out a voltage that is 1/10th of the current value (100A=10V). When this voltage exceeds the + input on the comparator, the output goes LOW, triggering a 555. The 555 puts out a relatively short pulse (~10uS) through a diode. This then pushes the voltage on the 494's deadtime comparator to 5V, meaning the pulse width goes to 0. But since the 555 shuts off quickly, the RC on the DTC slowly restores the voltage (and thus pulse width) back to normal. If the current does not back off, the output of the 311 stays low keeping the 555 output high, keeping the 494 off until the current falls.
One additional feedback circuit that might be useful would be to monitor the inductor current to make sure that it is in fact falling back to zero on each cycle. The reason is, this boost converter was not designed for continuous current mode, so allowing it to operate as such could be problematic. Normally the current limiter will catch this as continuous conduction usually leads to a current run-away condition, but this is not always the case... If I have problems in this area I will have to devise another circuit to detect this as well.
Input/line filtering:
This converter pulls current directly from the AC line, that is, there are no large filter capacitors to form a DC supply. So I have to filter out the 10khz from getting into the line. To do this I first used an LC filter, designed to operate well below 10khz, on the AC input. Then, after the full-wave rectification, I added an additional 30uF in high current film capacitors. These capacitors will perform most of the line filtering.
Testing so far:
Initial testing on my DRSSTC-.5 shows much promise. Using 71VAC input from a transformer I was able to boost to 360VDC at up to 500W input into the little TC. The boost converter remained cold. My "kill-a-watt" meter claims the power factor to be .99-1! Very cool :-). At one point, just to double check, the wattage was 490 while the VA bounced between 490 and 491. Next test will be on the DRSSTC-1, running 400-440VDC at over 1200W. I am confident that it will deliver great results as well.
I have performed the test on the DRSSTC-1, running up near 1500W max at 410VDC output. I have also since tested the boost converter on my DRSSTC-2 at up to 3300W input power. That was enough to produce 10 foot sparks as well as arc to the hot tub... at that point I decided to quit. The big coil really needs a new toroid (larger breakout voltage) before I push any further.
A Design Revision (8/15/05):
During high power testing, the boost failed about about 4500W input from unknown causes, but I suspect over-current of the IGBT switch. After re-examining my original design, I found some problems. Firstly, I designed for 5kW at 850V. This means that at lower voltages, I cannot support 5kw, and this is apparently a problem. So I decided to half the inductor size to allow for more headroom there. The boost now uses 2 individual 200uH inductors in what is called an interleaved converter. I basically have 2 boost converters, working 180 degrees out of phase. Each converter only has to handle half the load. There are a few benefits to this. Inductor losses decrease greatly since I only have to put half the current through each inductor (about 60A peak and 16A RMS). Also, the effective line draw is now at 20khz rather than 10khz, so this eases line filtering greatly. In fact, because the current is more continuously drawn from the line, filtering is even lesser of an issue. The TL494 with its complimentary outputs allows for an easy modifications into interleaving, especially since my pulse width is only about 35uS max anyway. Below are the revised schematics for the controller and power side:
 control
electronics
control
electronics
 power
electronics
power
electronics
Some major changes have come up with the control electronics. Mainly, the old method of current limiting wasn't so great, unstable at best. Now I employ pulse-by-pulse limiting. The 555 timer, once tripped, sends out a 15uS disable pulse to the drivers. This is short enough such that it wont effect the complementary output pulse from the TL494, but only terminate the pulse that triggered the limiter. Talking to Richie Burnett lead me to a few neat tricks which are also employed in the design. The most noteworthy is the use of current transformers to monitor the IGBT current. Normally a CT wouldn't work here because the current is DC, so the signal would have a large DC offset. But in this arrangement, we have a diode blocking the reverse cycle of the CT. This presents an open load the CT for any negative output, the voltage quickly rises to exceed the Bmax of the CT core, saturating and resetting it. Once the core is reset, its ready for the next positive going pulse. In effect, we have a pulse transformer which is able to handle the DC pulses through the IGBT. 1:100 CTs were hand wound on small ferrite cores. Pay particular attention to the placement of the CTs! With a 10 ohm burden, the ratio is now 10A per 1V output. The limiter is now set at 60A. Simulations suggest a 60A peak inductor current should allow for up to 7.5kW output down to 500V. We will see how it holds up running the big DRSSTC...
Here are some pictures of the new setup, yet to be tested at high power but I feel confident in the design:
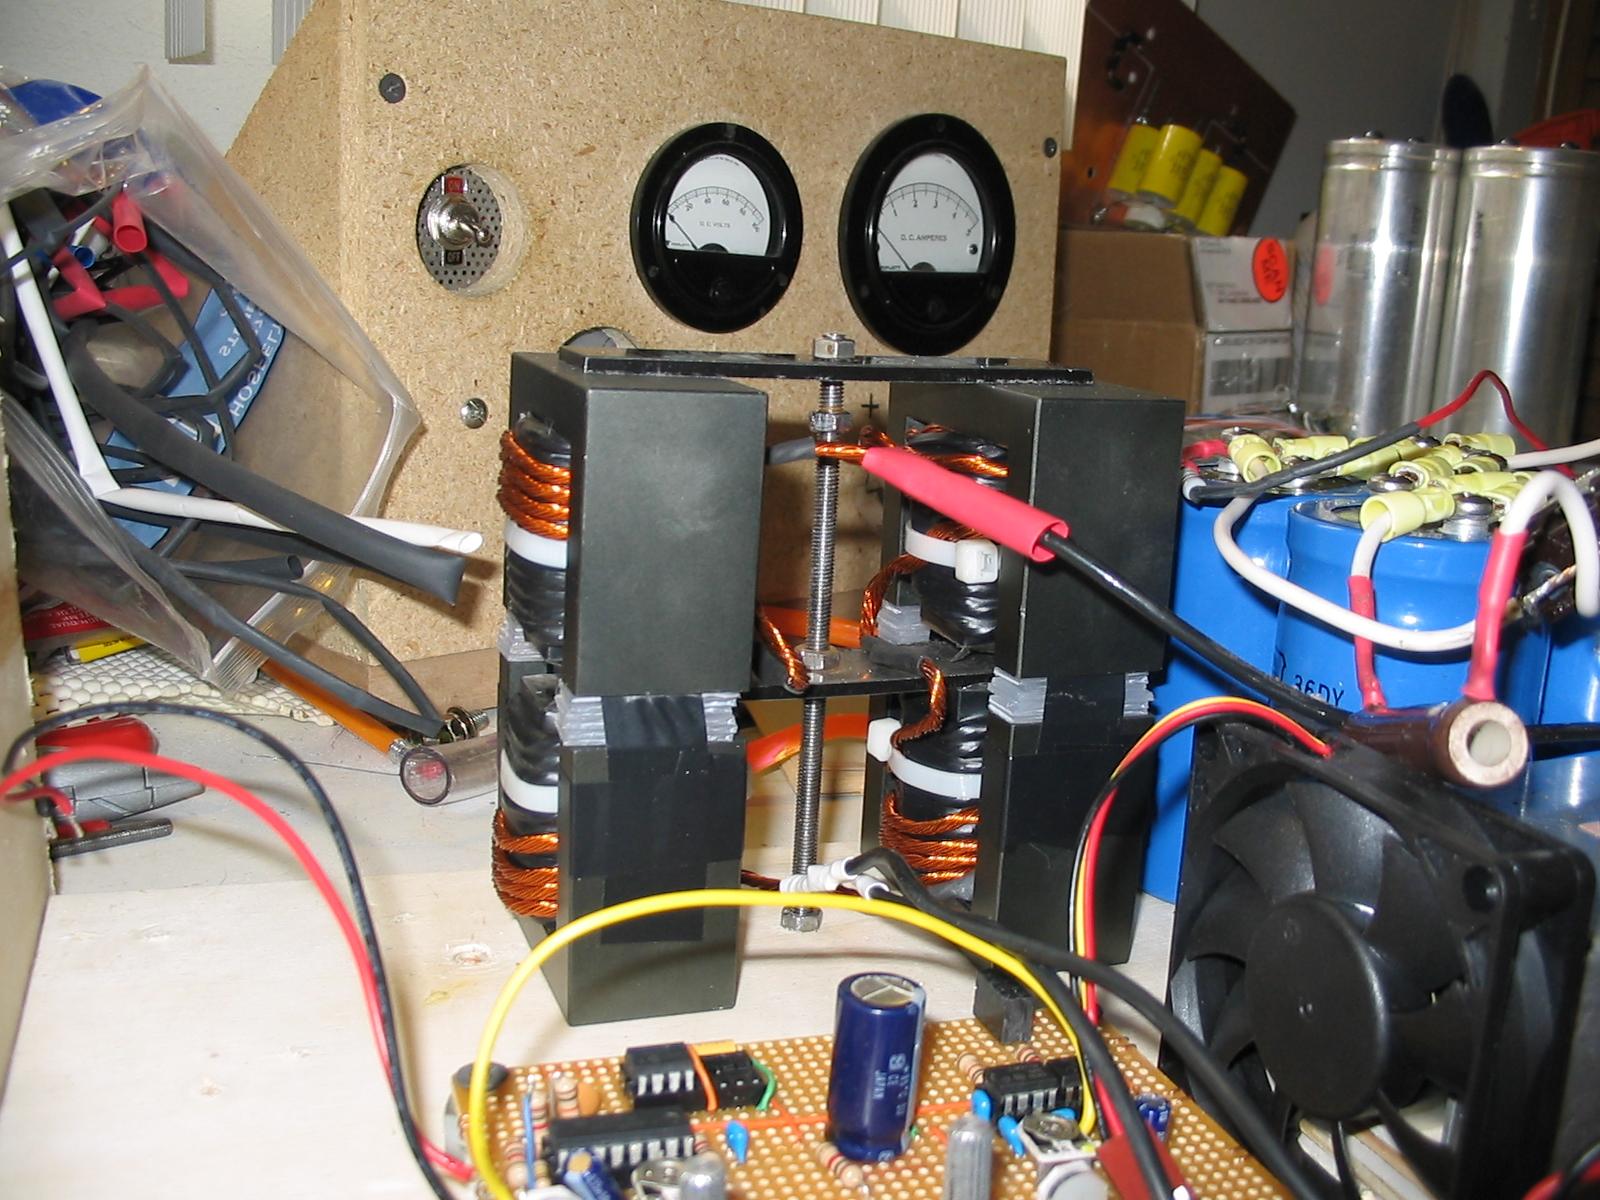 Here
are the 2 inductors, they measure 193 and 197 uH. Close enough...
That's aluminum clamping them down, hopefully not too much eddy loss there.
Here
are the 2 inductors, they measure 193 and 197 uH. Close enough...
That's aluminum clamping them down, hopefully not too much eddy loss there.
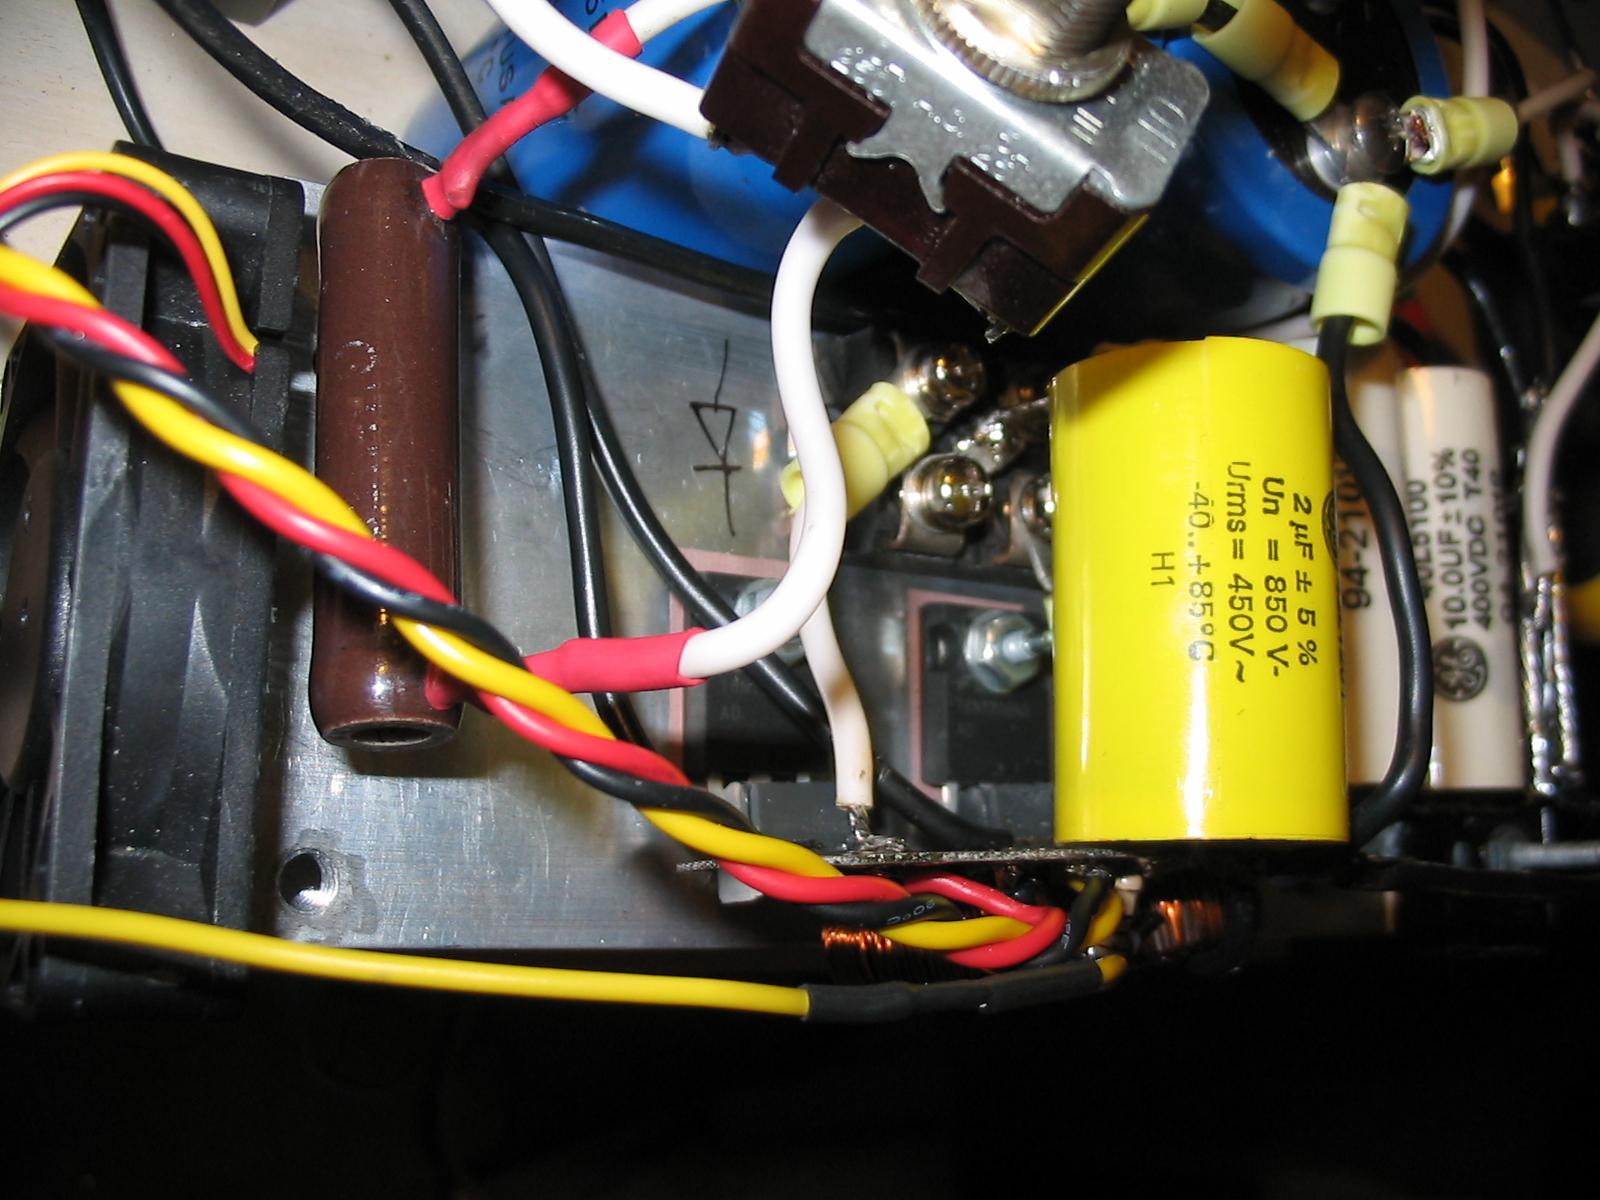
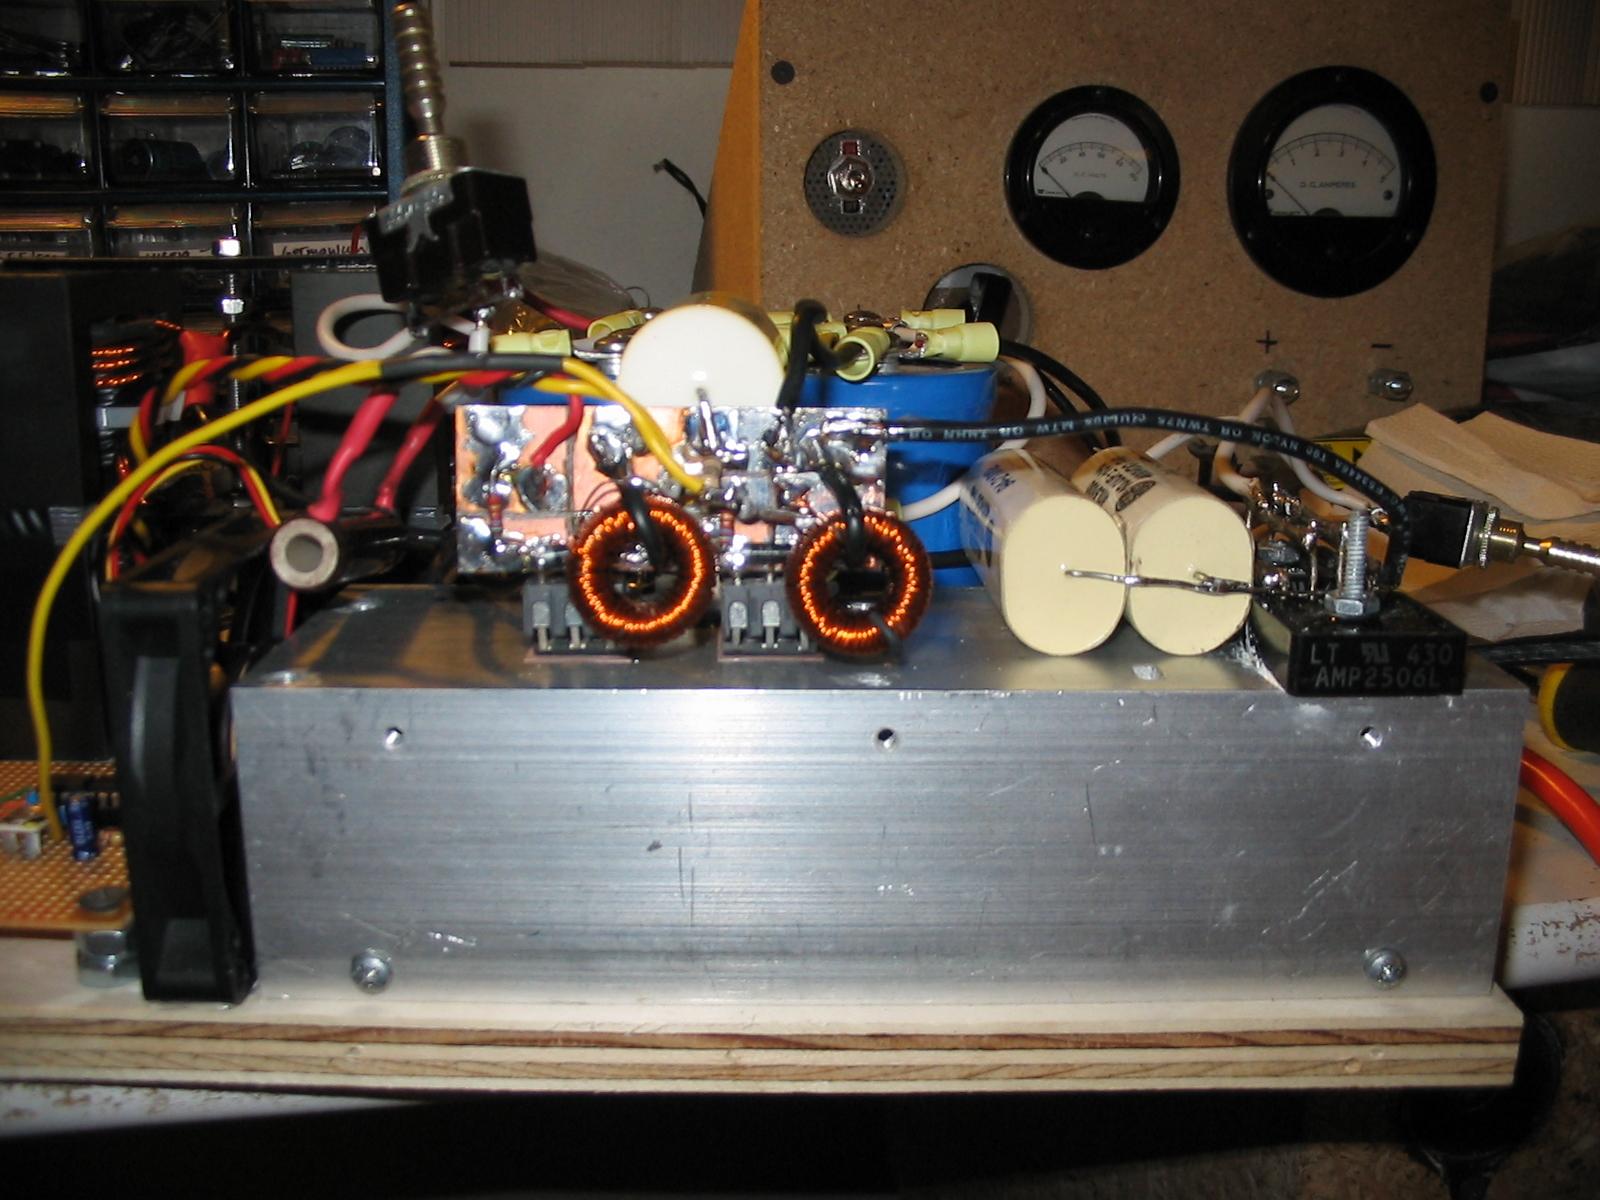
 You
can just about see the 2 IGBTs. The big 2uF snubber cap is plainly clear.
The SOT-227 package above the IGBTs is a dual diode.
You
can just about see the 2 IGBTs. The big 2uF snubber cap is plainly clear.
The SOT-227 package above the IGBTs is a dual diode.
 A
somewhat blurry picture showing the dual CTs and the PCB for the IGBT
connections.
A
somewhat blurry picture showing the dual CTs and the PCB for the IGBT
connections.
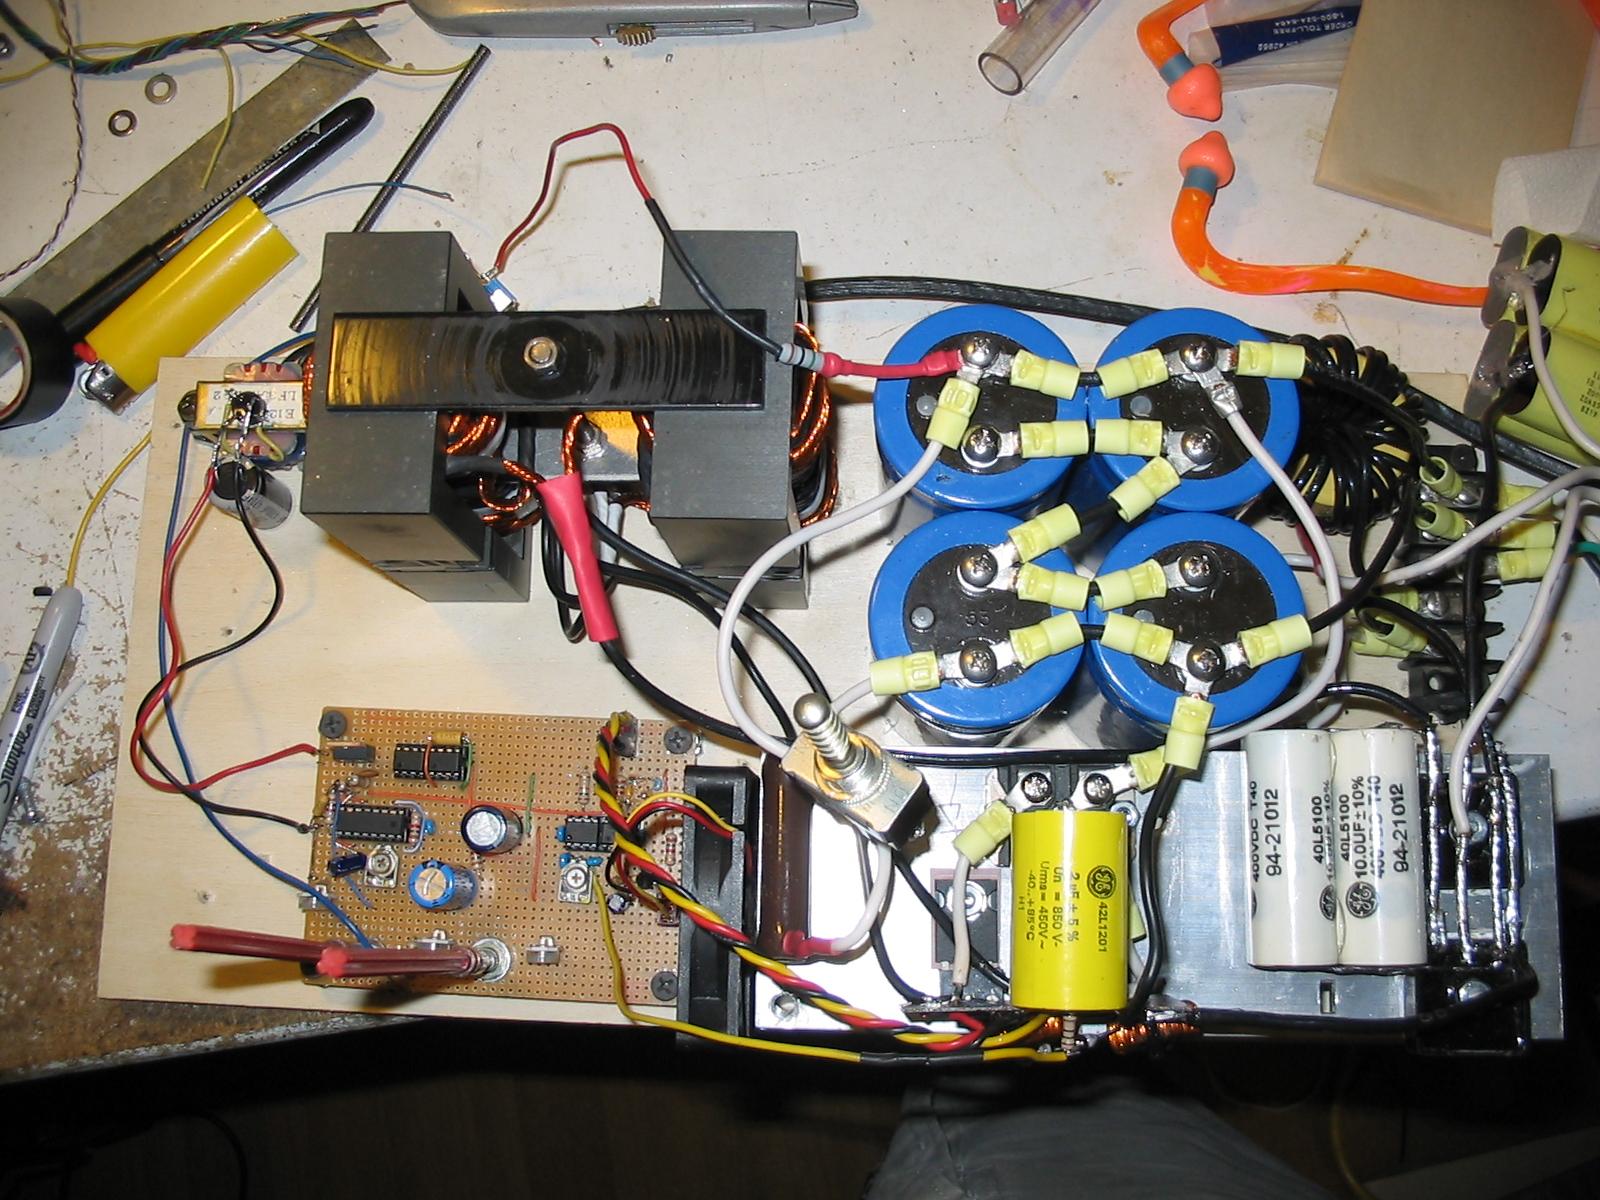 An
overview of the converter. The removal of the current transducer has
really cleared up a lot of space.
An
overview of the converter. The removal of the current transducer has
really cleared up a lot of space.
 The
plastic top is screwed down. On the left we have the voltage and pulse
width controls, then a miniature toggle to select 425V or 850V operation.
Next toggle is for the bleeder. All the way on the right is a 2-way
toggle, down position is for "charge", center is "off" and up is "run".
Just have to remember to charge the lytic bank (through the ballast capacitors)
before I switch it to run!
The
plastic top is screwed down. On the left we have the voltage and pulse
width controls, then a miniature toggle to select 425V or 850V operation.
Next toggle is for the bleeder. All the way on the right is a 2-way
toggle, down position is for "charge", center is "off" and up is "run".
Just have to remember to charge the lytic bank (through the ballast capacitors)
before I switch it to run!
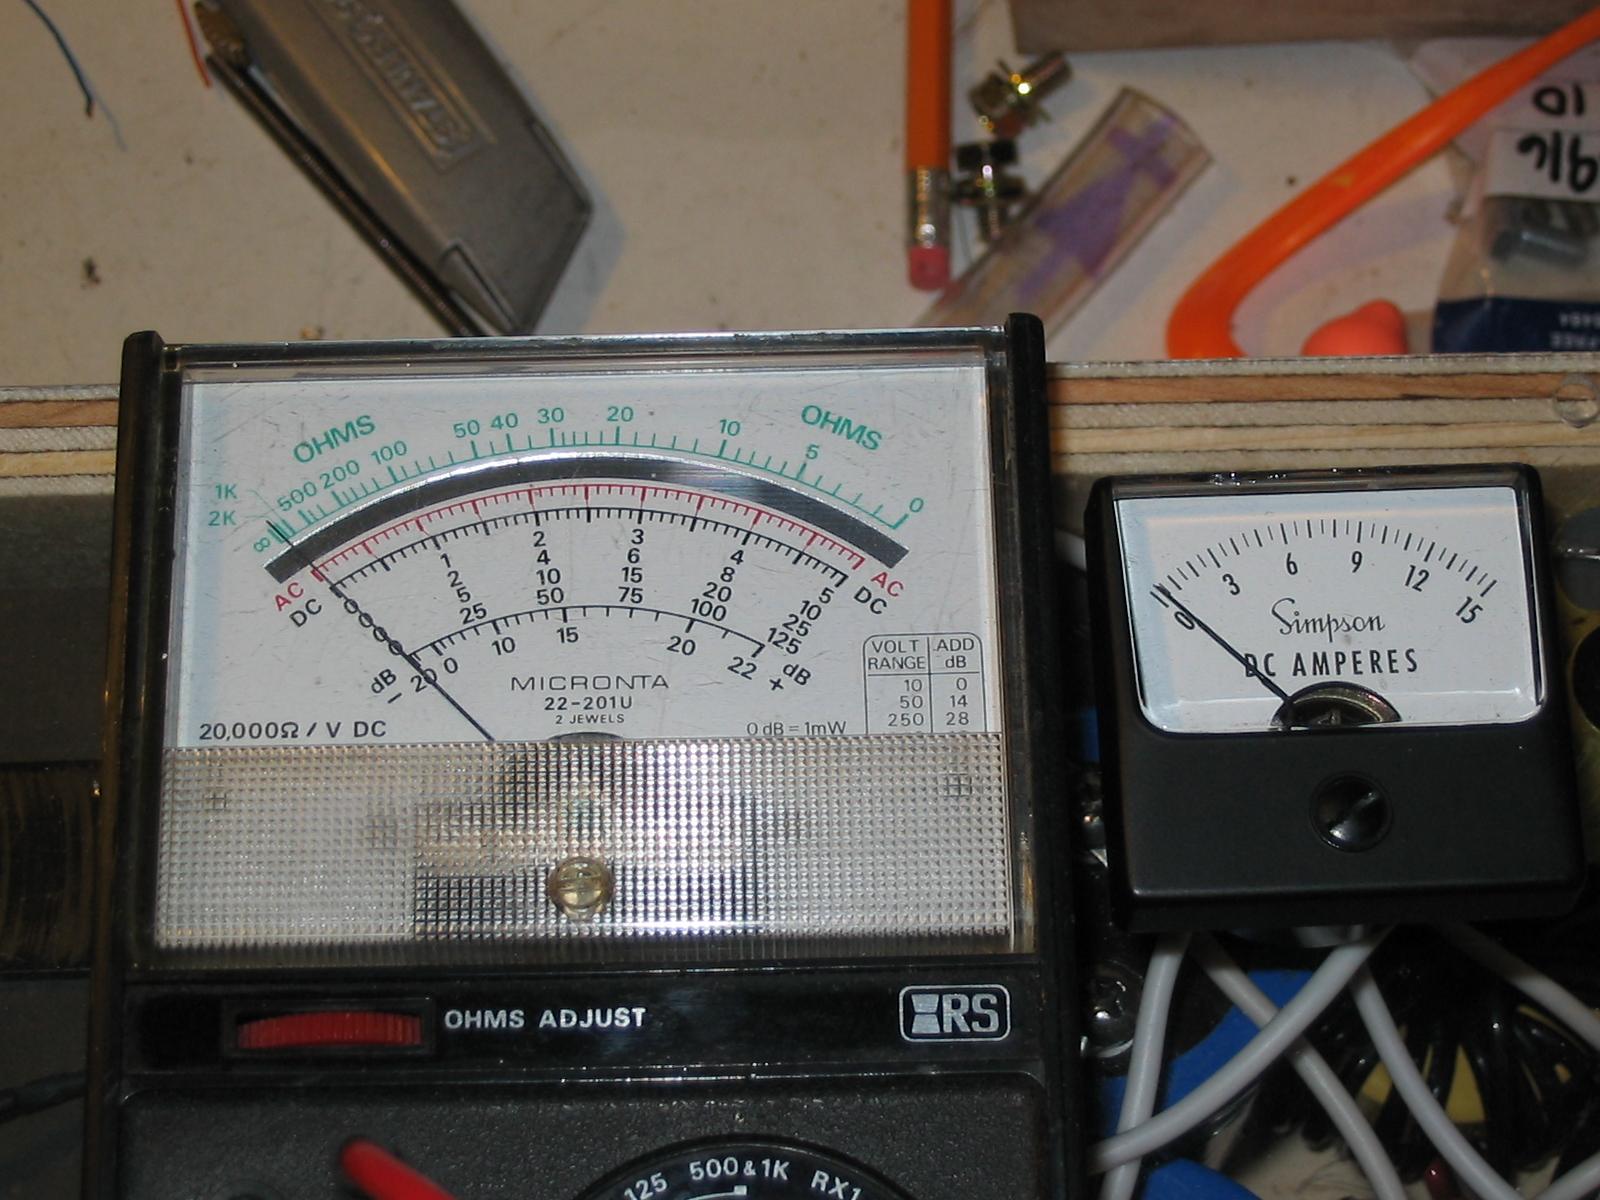 In
case its not obvious, the meter on the left is a voltage meter (500V and 1000V
ranges) and the one on the right is a 15A DC meter.
In
case its not obvious, the meter on the left is a voltage meter (500V and 1000V
ranges) and the one on the right is a 15A DC meter.
More to come later...